Adding An Effect To Just Part Of An Audio Track In Reaper
Have you ever been working on mixing audio tracks in a digital audio workstation (DAW) program (such as Reaper, Pro Tools, Sonar, Ableton Live, Logic Pro, etc.), and wanted to apply an effect to only one small section of a track? There don’t seem to be any obvious ways to do it, since effect plugins are almost always applied to the entire track. Well though it isn’t obvious, there is a quick and easy way to do it in Reaper. Here’s how.
What’s In A Track?
First it might be handy to review what a track actually is. Basically, it’s just a container that we see on the screen of a DAW, usually stretching horizontally across the screen. See Figure 1.

When you record (or insert) some audio, it goes into a track – you can see the “blobs” (the non-technical term for how audio wave forms are visualized:-P) in the track as you record them. When you stop recording, you have created an “audio item” in a track. See figure 2.

You can add more audio items into the same track, either by recording more audio or inserting a previously recorded audio file. You can also slice up a single audio item. There are several reasons someone might want to do this, but let’s say you have recorded a voice onto a track and want to apply an effect – say, reverb, for example – to JUST one word or phrase of that audio.
Usually, when you want to add an effect in Reaper, you click the “FX button on the track control panel (the area on the left of the track with all the buttons and knobs), and select your plugin. The assumption is that you’d want to apply that effect to the entire track. But that doesn’t help us here, does it? We only want that one phrase to have the reverb on it (this could be any effect though, like EQ or compression, etc.).
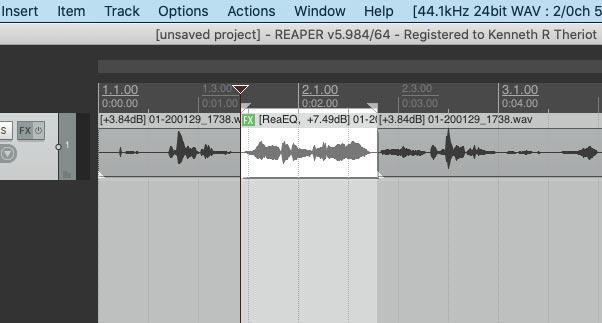
Split That Audio

Reaper allows you to apply effects ONLY to an audio item in a track, even if you don’t have an effect selected in the track control panel. So in our example, you’d need to make your phrase its own item by “splitting” it. To do this, highlight the phrase and then right-mouse click anywhere on the audio item. This displays a drop-down menu of all sorts of things you can do to your audio item. We are looking for “Split items at time selection.” See Figure 3.
The keyboard shortcut for this action is “Shift+S.” It places a split at the edges of your selection. So be sure those edges start just before your phrase and end just after it.
Put Effect Only On Your New Item
So now that you’ve created a new audio item for the phrase you want to put reverb on, right mouse-click on your phrase to launch that drop-down menu again. This time, choose “Item Properties,” which brings up the Media Item Properties box. See Figure 4.

You want the button at the bottom that says “Take FX.” The term “take” is another word for “item” – as in “take 1, take 2,” etc. Anyway, clicking that button allows you to choose a plugin the same way as the “FX” button on the track control panel. But it will only apply that plugin effect to your item – exactly what we wanted. Cool, huh?
It takes a lot longer to explain that to actually do. It’s really easy and can be very useful for a number of things. Maybe you want to use EQ or compression to fix some audio problem in only a couple of places on a track. You can also use this technique to turn the volume down quickly on just a piece of audio by dragging the top of the item down.
So if you were wondering how you could apply an effect to just one small part of a track without affecting the rest of the audio on that track, now you know how to do that in Reaper.
Thanks for your tutorial, but, I´ve experimented issues when spliting audio,..a serious “click” noise that persists still when glued and healed items, and crossfading is not an option when, lets say, I´m working in a guitar lead part trying to add a feedback effect to the last note or a long delay 🙁
Leonardo,
That CAN happen. Yes. But you can avoid the click with the fades on an item. Also, that is why you should never glue a clipped item if you don’t need to. You slice out a section and THEN you can adjust the fade until things are seamless.
ThankYou Ken. Ive been needing to know that Answer & solution. I know that I can do it in MagixMM2016 DAW & it always comes put sounding great, but I didnt yet know how to do it in Reaper. You Sir have taught me a nifty & Invaluable; “trick of the Trade”. Cheers, God Bless & Happy Recording.
That’s awesome, Jimmy! Thanks for letting me know that. I’m so glad it was of help to you.
Ken , are You Home Brew Audio? Im subscribed to you on Youtube & follow you on Twitter Man! Youre the best Brother. Thanks
Yup. That’s me. Thanks!
This worked perfect. no problems whatsoever. thanks mate! cheers. – Another technique is to clip the portion of the track you want to add effects to and cut and paste it down to a new track, but your method is far better and easier and looks better in the DAW.
Glad it helped, Jimmy!
But can I set an item to ignore the track FX? Havent found an answer to that yet. Or maybe I have…
No Graham. If I didn’t want a part of my track to be affected by a track effect, I’d just move that section to another track – probably right below the one with the rest of that audio.
Split an Next Zero Crossing can be helpful to prevent clicks since it breaks a track into clips at the point where the waveform of the “blob” is at zero.
Thanks. It can be helpful (Option-Z). But the auto fades in and out of each audio item allow a smooth transition, sort of creating a zero-crossings when doing it.
Could this be used to insert Melodyne at only certain points in a track, do you think?
Yes, I’m pretty sure you could. One other way to do that would be to use track automation envelopes. You could load Melodyne on the track. Then open the envelope track for Melodyne (it would show up under the audio track). You could pull the envelope line down as default (no effect applied) and then rasie it up for just the section or sections where you want it applied. But that way sounds a bit more complex. Both ways should work.
How do you duplicate Audio and then make it unique like in {FL Studio}
So that you can mess around with other take without affecting the original take.
In Reaper it’s super easy. Just drag the audio on one track into an empty track below it while holding down the Command button (Mac). That will copy the audio onto that second track. Then you can do whatever you want to it without affecting the original. You can also right-click on the first audio item and select Copy. Then go to an empty track and paste it in.
Thanks a lot for your reply, Ken
You’re welcome!
As a matter of interest, in your Reaper course (which I bought) you talk about creating harmonies with Reatune. Have you ever tried that with Melodyne? It really creates some interesting effects.
I used two other programs – Antares Harmony Engine EVO and Vielklang Instant Harmony, both of which are very similar to Melodyne – in my course “Harmony Recording Awesomeness.”
This is a great feature, but is there a way to do the opposite? Like I have a track split into tonnes of media items, and my FX chain on the whole track, but on one item, the noise reduction is too heavy for one soft sibilant sound or something, so I want one little sliver with no FX. Can I exclude a media item from the track FX? Or do I have to add a whole new track made of only one millisecond of the “th” or “s” that the main track is missing?
Hi Jaye. Actually yes. You’d use an envelope/automation track. On the main track’s Track Control Panel, click on the button that says “Trim.” That opens the automation window. You’ll see a bunch of things in there with check boxes next to them, like volume, pan, etc. find the one for your effect. You’ll see something like “Wet” as a choice. Put a check in that box. Then an envelope line will appear across the envelope/automation track that represents the effect. just highlight the time selection where you want less of the effect, and turn the knob down (to the left) on the envelope/automation track control panel. That will reduce the effect on JUST the area you have selected. I hope that made sense. The process is exactly the same as in this video of mine showing how to do it with volume – https://youtu.be/RXKDqm8z64M
Ken, I just read through this and will be using it as I proceed with my “project”. I’m 76 years old and have been playing guitar and singing for over 50 years. My wife of 50 years has asked me to record “my songs” for posterity. I’m just getting started with Reaper using a MXL 990 Condenser Microphone and a Focusrite Scarlett Solo 3rd Gen audio interface. I have been testing things the last couple of days using a demo of Harmony Engine Evo. My efforts so far include recording a small portion of a bluegrass song I like and applying harmony with Evo using chord degrees (I believe you had a video several years ago that talks about that technique). I also recorded the same song and used my TC Helicon Harmony G-XT to generate two-voice harmony. Although the results are acceptable in both cases, I would like to be able to generate even tighter harmonies and I don’t sing harmony parts, so must generate them by other means. Mostly my harmony part requirements are for choruses in each song. I want to be able to get to the point where creating harmonies via a DAW don’t take a full day for each song. I’ll never get my “wife’s” project done in that manner. I have looked at your “Harmony Recording Awesomeness” course and am very intrigued by it. Would I be correct in assuming that Lesson 10 in the series would be most applicable to my situation? Does the course teach me pretty much everything I will need to know to accomplish my “simple” goals? I’m also curious if it will go in to detail concerning the use of the Evo chord degrees capability for harmony generation.
I look forward to your response. Perhaps you could contact me via email.
Hi Ken. Ys, I think the full Lesson 10 would show you ways to do what you want. I included a couple of ways to do it in Reaper for free (built in effects). but those are mainly for people who have a zero budget and can’t really sing and record themselves singing harmony. But really they don’t sound all that terrific. I do show multiple ways to use Harmony Engine EVO, as well as using another paid plugin called Vielklang Instant Harmony. there are lots of ways to do it in HE EVO. So hopefully that will do what you want it to. I’ll also send this via email. Hope that helps!
Hello, Ken! I was able to use this feature on a recorded take from a real bass guitar (works great!), but when I split off midi items I can’t get effects to come through on the individual items. I have to right-click on any midi items and “apply track/take effects to items as new take” and I can apply separate effects then. It would be nice if I could just split off the midi items without taking that step though. Any chance there is a way around that?
Hi Joel. I don’t have an answer at the moment. But I will try some things as soon as can.