Improve The Quality Of The Audio You Record At Home – Tip 2
This is the second in a series of tips designed to help you record better quality audio in your home studio. Last week, I showed you a super quick and easy way to immediately improve your audio quality – when recording your voice, get close to the mic. If you missed last week’s post and video, you can find them here: Improve The Quality Of The Audio You Record At Home – Tip 1.

This week’s tip is actually a couple of tips together. Yay for bonus tips! First, I should mention my assumptions. I assume that you are recording in a room with poor room acoustics. Just about any room in your house, especially a converted bedroom, would quality.
I also assume you have no acoustic treatment such as absorbent foam on the walls, or a treated isolation booth. Most folks are in this category, but even if you have taken steps to reduce poor room sound in your home studio, this week’s tips are still well worth knowing about.
Have a Heart – Use The Cardioid Setting

All microphones have some sort of polar (or pickup) pattern associated with them. I wrote about this in the article Directional and Omnidirectional Microphones – What Are They Good For?
Most microphones default to a pattern called “cardioid” (so you will probably not have to worry about using the wrong one). If that word sounds like it has something to do with hearts, that’s deliberate. The pickup pattern for a cardioid mic looks like a heart.
See the explanation in the video above. Essentially, it means the mic picks up sound from in front of it and rejects sound from behind it. So if there is a noisy computer or something else that you want to PREVENT getting into your recording, point the back of a cardioid mic at that noisy thing or area.
Some microphones have switchable patterns, so you get to choose whether to use the cardioid pattern, or one of two (usually) other patterns – figure-8, and omnidirectional. Unless you already know how best to use the other patterns, and are doing it deliberately, I HIGHLY recommend making certain your mic is set to the cardioid setting. Again, the video will demonstrate how to do this, and you’ll hear what can happen if you get it wrong!
But Which Side Is Which?
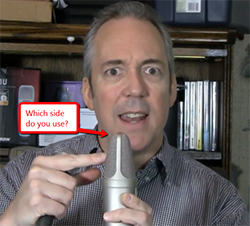
With a handheld microphone like the one in the picture above on the right, it’s pretty obvious which end you speak into. But with large diaphragm condenser (LDC) microphones, this is often NOT the case.
More than one very smart person I know has recorded into the WRONG side of an LDC mic. In the video, you will hear what it sounds like to record on the wrong side.
But how can you tell? Well, ultimately you can tell by trying both ends with headphones on. It’ll be obvious which is the correct side. But every LDC I’ve ever used has had the company logo on the correct side.
So if you are recording in a converted room in your house – in other words, a bad-sounding room (usually) – you now know a few things you can do to drastically improve the quality of the audio you record in that room without having to spend any money or build anything. Try them for yourself.
Here’s the Part 3 of this series.
Thank you again for sending these priceless tips.
Keith,
You are most welcome!
Cheers,
Ken
Very good info. Thanks!
That’s some crazy wallpaper behind you in your “studio”!
I know Dan. It was a kid’s room when we bought the house. From far away it looks like someone pukes on the walls doesn’t it? It’s actually a repeating pattern of a map of the world with nautical symbols splashed about. I’ve just been too lazy to change it:-P.
Ken