What is Ripple Editing?
Ripple editing can be a very useful tool in both audio and video editing. But it’s one of those things you don’t want in the “on” position all the time. If you think it’s on and merrily go about editing audio items on your track, you’ll have caused quite a train wreck with your audio clips. Likewise, if you think ripple editing is turned off, and you start deleting or moving items on your track – train wreck.
Definition of a couple of terms
First, let me clarify a thing or two about two terms I’ll be using.
Track: A track is simply a container in audio and video software. It is usually displayed as a sort of swim-lane in horizontal stripes across the screen. You put media “items” into these tracks, where you can move them around (left for earlier in time and right for later in time).
Item: Any audio, video or MIDI file that you place on a track. The big source of potential confusion on this is that while the underlying media is a file (.wav, .mp3, .mid, etc.), once it’s placed into a track, the edits you make do not affect the underlying file. If you insert a wav audio file onto a track, it becomes an item on the track, which is sort of like a copy of file. If you slice that item into 5 pieces, the underlying file is still in one piece, for example. This is typically called non-destructive editing.
So what is ripple editing?
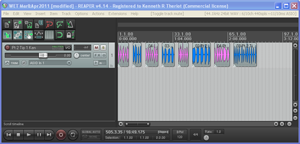
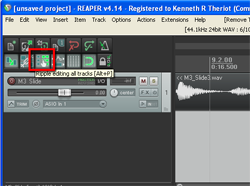
Where ripple editing comes into play is when you have multiple items on a track. See the picture on the left, where I have one track with 8 items in it. Now let’s say I want to slide one of the items (say, the 3rd item from left) to the right just a smidge. This could be because there wasn’t enough blank space (silence) between the blue item before it, and maybe you want it closer to the 4th item, the blue one after it. With ripple editing turned off, you simply left-mouse-click on the item, and drag it to the right. Only THAT item will move and none of the others will.
However, if you did this same thing with ripple editing turned on, not only would the 3rd item from the left move to the right, but every item to the right of it would move by the same amount. The first two items in the track would stay where they were.
Why would you use ripple editing?
Very often, when you have multiple items in a track, you want to maintain the spacing between each item. This would be really hard to do if you had to delete one of the items in the middle of the track without ripple editing. It would leave a huge gap where the deleted item used to be. You’d have to individually drag each of the items, that are on the right of the gap back to the left, one at a time, in order get everything correct again, which would not only be tedious, but the spacing between those items would have to be re-done. But if you have ripple editing turned on when you delete a middle item, all the items to the right immediately shift to the left, not only covering up the gap, but also maintaining the timing relationship between themselves.
Note that this is NOT the same thing as “grouping” all the items on a track, which is another option altogether. When ripple editing, everything you do (if it affects timing – like deleting, moving, lengthening or shortening) to an item affects that item and any item to the right of it, but not the items on the left, the ones that occur earlier in time to the item you are editing. If you group all the items, then every item is affected regardless of whether they are to the left or to the right of the item being edited.
Another useful use of ripple editing is when recording music. Frequently everything is aligned to a tempo grid in the audio software. If you realize that you put too many measures in your introduction (I’ve done this many times) you can easily delete a measure. But without ripple editing, you’ll just end up with a one-bar-long gap of silence in your song after you delete it. With ripple editing turned on, every measure to the right of the deletion will shift to the left, the beginning of the subsequent measure moving nicely into place (assuming you deleted exactly one measure).
This is all very like using a word processor. You type text onto the screen from left to right (in English). If you see a word you want to delete, you can highlight it and hit the “delete” key. What happens? All the text to the right of it shifts back to the left. What it you need to insert some text in the middle of a sentence? You just place your cursor and start typing. What happens to the text to the right? It moves to the right with every keystroke. THAT is just like ripple editing, which is turned on by default in most word/text processors. If you’ve ever turned it off by accident you’ll see how messed up things can get. If you try to insert a word into a sentence, you’ll start deleting everything to the right of it.
Hopefully that makes ripple editing more clear. If you’d like me to put up a video to help clarify it, let me know in the comments below!
Excellent explanation, thanks Ken. Always got Ripple editing and Grouping mixed up!
You’re welcome Dave. Glad it helped.
Cheers,
Ken
Excellent! The text editor analogy was great.
Thanks Lucas!
Is there a way to have the ripple edit affect multiple tracks, but not all tracks? What I want to be able to do is insert a bit of material on one track and have everything else move to the right, EXCEPT for a couple of tracks of dronelike material that I want to continue through without being split.
Yes. First, set Ripple Editing to “Per Track” like you’d do for only one track. But then you can use your cursor (right click and hold and drag) to select the items in the tracks you want to move. You’d want to make sure the tracks are next to each other first so you can lasso everything on both tracks. Then you can move items and have downstream items on both tracks move with them. If you need to have a permanent multi-track ripple for more detailed stuff (making cuts to only one track but having the second track move with the first, I’d recommend copying the tracks you DON’T want to move to another project, then use “all tracks” ripple editing. Then move those other tracks back in. Hope those 2 options help.
Ah, thanks, I’ll see if I can get the first option to work…
Another similar option that would be helpful would be one that only affects items that _begin_ after the point you’re editing, and avoids splitting any item that straddles the edit point. (That way it doesn’t necessarily depend on the tracks.) I thought maybe locking items could do that, but apparently it doesn’t.
Thanks— I think I actually just found another method that does more what I want to do: If I select ripple edit for all and then move an item, then it apparently doesn’t affect items whose _beginnings_ come before the point you’re editing. Before, I had been trying to insert a new item instead of move, and when you insert, it splits the items that overlap it, which wasn’t what I wanted. So the key is to move an item first, and then switch off ripple edit to insert something before it. Anyway, it’s helpful to understand the options better.
That is actually what ripple editing is supposed to do – only move the items “downstream” (to the right of where your cursor is, if I understand this correctly. Not sure what was happening with the overlapping thing. But when things get weird with Reaper, I always go to the Reaper Forum, who have tons of experts in things I may not have dealt with (because Reaper has hundreds of actions and functions, etc. maybe thousands). And they are super responsive. If you need to do that, go here: https://forum.cockos.com/