How To Build A Home Recording Studio: Part 3 – Microphones And Interface
This is part 3 in our How to Build a Home Recording Studio series that shows you how to set up a computer-based studio capable of recording pro-quality audio.
In part 2, we talked about how to prevent and/or reduce noise. That is the biggest enemy of great sounding audio. Today let’s address step #2 of computer recording basics. That is the part where sound is converted to little ones and zeros (digital audio) by a sound card/interface.
Changing Regular Sound To “Computer” Sound
To record on a computer, you have to change/convert audio into “digital” audio that those computers can understand. The poor quality of audio conversion is the main reason the $5 plastic PC mic going into a sound card is not the best idea for a studio set-up.
The microphone is very limited in how accurate it can be since the components are small and cheap and tend to be oversensitive to certain sounds (p-pops and rumble and other low frequency stuff), and not sensitive enough to others.
Then comes the fact that the converters built in to integrated sound cards of most computers are of poor quality. Then to top it all off, built-in sound cards pick up a lot of electrical noise from the motherboard.
USB Mics
The best first step then is to avoid having to plug a microphone into an integrated sound card. The fastest and most inexpensive way to do that is to use a USB microphone, which will have digital converters built right into it, making for better quality conversion and avoiding much of the computer noise. And since the converters are built in, you won’t need a separate audio interface, which is usually at least $100 and is another piece of gear (usually a small box) to deal with.
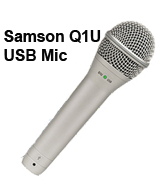
But not all USB mics are good for creating pro audio. The small headset USB mics (~$25) are still quite small and have a lot of the same accuracy and frequency response limitations as other non-USB pc mics. But for not much more money than the headsets, you can get larger, more accurate USB mic like the Samson Q2U for $59.
This “upgrade” is where you move into the realm of professional quality audio – improving your sound greatly by moving from the tiny USB headset mics to larger USB mics.
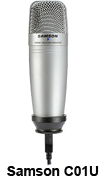
You can then incrementally improve sound quality – your next upgrade – by moving to a large diaphragm condenser USB mic like the Samson C01U ($80). Prices go up from there for LDC type USB mics, from the popular Blue Yeti for $130, to around $200 for the MXL UR-1 USB Ribbon Mic.
I find that even with the larger USB mics you still get a low-level hiss, usually so low you can only hear it in headphones, but still a bit more than you’d want to have if you were sending a voice-over job to a client. But noise reduction programs usually can fix this quite well.
Time vs Money
That brings up another point about audio quality. With the basic knowledge we’ve been talking about, you can get top-notch audio quality from inexpensive gear, but it may take more time than if you had the expensive gear. Having to run noise reduction on everything is one example. This is fine, though, for most people as they frequently have more time available than cash. For most people, a large USB mic will give them as much audio quality as they will ever need.
Then as you can afford to, you can upgrade your studio in increments — BUT only if you need to! You should definitely try to let your need drive your buying decisions so you only end up with what you need. This will save you lots of time and money. It is all too common for people to end up buying lots of gear they don’t know how to use, and that they really don’t need, just because a sales person told them to.
So that’s Home Recording Studio Configuration #1 – A microphone plugged directly into a computer.
Home Recording Studio Setup #2
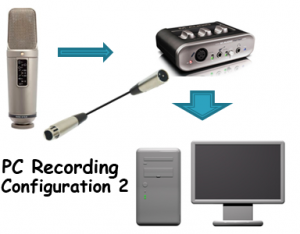
If you wish to move into the realm of great audio quality, you need to consider moving to home recording studio configuration #2 (a microphone plugged into an interface or other 3rd-party device designed to accept a standard 3-pin (XLR) microphone cable). This set-up will set the stage for getting the best audio quality possible. Even the highest-end computer-based studios use some form of this configuration.
Microphones for Setup #2
Without going into a huge dissertation on microphone types I’m going to mention the two main kinds of microphones, dynamic mics and condenser mics. Here is what you need to know: for recording, use a condenser microphone.
Of course there are exceptions to every rule, but in general dynamic mics are best for live performance and certain types of recording, like guitar amps and drums. Condensers, especially large diaphragm condensers, are best for recording the human voice. Let’s take a look at a few examples.
Large Diaphragm Condensers (LDC)
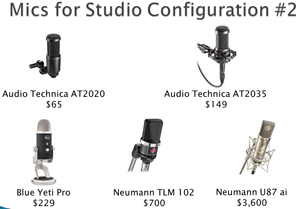
Here are just a few examples of many available large diaphragm condenser (LDC) mics out there. As you can see in the picture on the left, prices start below $100 and can go pretty darned high into the thousands. The cheaper LDCs are still going to sound pretty darned good if what you’ve been using is a USB headset mic or other tiny computer mic.
But the reason why there is such a range of prices is that, as I said in part 1 of this series, the more expensive mics can and do produce better quality than the cheaper ones for a variety of reasons, internal components and manufacturing specs being two biggies.
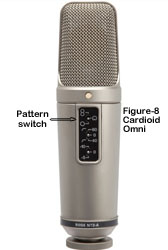
Cheap LDCs often are less accurate and may sound harsh and thin in the middle to high frequencies. Also, features such as multiple pattern (cardioid/figure-8/omni), bass roll-off, and pad switches will make a mic more expensive. The good news is that you can upgrade your studio with better mics in increments of $50 – $100 at a time.
The ones that are a bit more expensive but worth it
I currently use a Rode NT2-A as my main microphone, which runs about $399 and has all 3 of the switch options I mentioned above.
Its little sibling, the NT1-A, which has none of the switches (default pickup pattern is cardioid), costs significantly less at $229. The latter also has sounds slightly different (some say not quite as good) capsule as well.
Another good choice is the Audio-Technica AT2035, which is only about $150. I reviewed that one (with audio samples) here: Review of the Audio-Technica AT2035 Microphone.
One of these days I’ll probably step up to one of the Neumann LDCs, such as the TLM 102 or TLM 103. Neumann microphones are some of the best available, and as you can see from the picture above, the price reflects that.
Keep in mind that these are standard (not USB) mics with 3-pin XLR connectors, so they will need to be plugged into an interface of some kind to both amplify the signal and convert analog sound to digital audio. Speaking of which…
The Interface for Setup #2
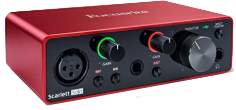
Audio interface units, such as the Focusrite Scarlett Solo (see picture on left) costing ~$100, typically accept microphone (XLR) inputs, and usually instrument inputs as well. The Solo only has 1 input though, so can only record one thing at a time.
Interfaces like these do two main things. They amplify microphone signals using what is called a “preamp” (short for pre-amplifier), and they convert sound into digital audio by means of the analog-to-digital converters built into them. They also come with something called “phantom power” which is required for condenser mics.
Combine one of these interfaces with a standard (non-USB) large diaphragm condenser mic and the result is crystal clear, very detailed and accurate audio.
You can put together an entry-level Setup #2 studio for under $200 (not including the stands and other accessories). Even the extreme high-end recording setups will use some version of the mic>interface>computer configuration. For example, a high-end studio using a Neumann U-87 mic ($3,100) and Pro Tools HD Interface with 16 inputs ($4,995) set-up will cost around $8,100.
Most folks will find that even the least expensive setups (~$300) will be good enough for anything they’ll ever want to do.
That’s it for part 3 of the How To Build a Home Recording Studio series. In part 4 we will discuss the software.
See you then!
Ken
[…] part 3 of our 5-part post series, How To Build A Home Recording Studio, I mention two ways to set up a recording studio on your […]
Shared! This is AWESOME stuff! Thank you!
You’re welcome!
This was helpful, thank you
I got a USB microphone and I want record songs using Audacity as my software, but I’m finding it difficult to sing while listening to my instrumental audio, any help with that please?
with a USB mic, the besst be is probably to use the headphone jack on the mic (most USB mics have them now).