Reaper Tips: Copy Selected Area Of Items
 Of all the Reaper tips that I have to offer, some are so simple that at first they hardly seem worth mentioning. But they can save you a lot of time and a headache or two. That is the case with today’s tip – using the Copy Selected Area of Items action.
This tip is most valuable for those recording music (as opposed to voice-over stuff), though it is a good all-around thing to know about in either case. OK, so let’s say you just recorded an instrument track for your song – a guitar or piano maybe. And let’s say you recorded it to a set project tempo using a click track. To see why you might want to do this, see our article Using a Click Track For Recording Music.
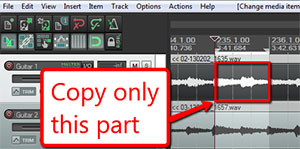
Now let’s say that while listening to your newly recorded guitar track, you notice that on one measure, there was a little mistake, or a stray note. Maybe the strings buzzed. Whatever the issue, you really would rather not have that in the final recording. Do you need to record the entire track again? Surely not. Even in the old days of analog tape recording, you could fix that mistake by punching in/out to record just that section without the flaw. But we’re recording in the golden age of digital audio now! One of the best – if not THE best advantage of this is the ability to copy and paste. All you have to do is find another place in the song where you play the same chord or phrase. Then you can copy that and sort of “graft” it into the same spot where the offending audio lives.
This job will be much faster and easier if you have: recorded to a click track, and make sure to turn on the Snap tool in in your DAW. Doing the latter will make it quick and easy to select a correct measure or beat by snapping the edges of your audio selection (just click and drag to select). Then you can just paste the “good” sample that you just copied right underneath the “bad” section (on a new track – see our article Quickly Fix Audio Recording Mistakes by Overdubbing, Part 2 for the step-by-step, plus video, on doing this) all ready for pasting.
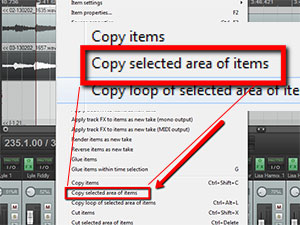 But wait. I kinda skipped right over how to copy JUST the correct measure or beat. If all you do is highlight a section of your audio and select Copy Items (or use CTRL-C), you will have copied the entire track’s worth of audio onto your clipboard! That will mess everything up when it comes time to paste. In Reaper, you have to choose Copy selected area of items instead. Just put your mouse onto the highlighted area of the audio, right mouse-click, and choose that from the drop-down menu (see the picture to the left). Then and only then will you have copied ONLY the section you want to paste over your mistake.
Believe me, the more you start taking advantage of the cut/copy/paste abilities in modern computer audio recording, this tip will come in very handy and save you time and frustration.
For more on how to use Reaper to record pro audio on your computer, come take the video tour of our latest tutorial course The Newbies Guide to Audio Recording Awesomeness 2: Pro Recording With Reaper.
Happy recording!
Thank You!!
You’re welcome!