Song Recording Studio: How To Set One Up At Home
Here is how you can set up a song recording studio at home without having to spend a ton of money. You also don’t need to be an audio engineer or go back to school just to learn how to use all the gear and software. And with a little bit of knowledge about how to use the gear, you can record high quality audio at home easily.
And in the process of setting up a home recording studio for recording songs, you’ll also have a setup for creating and producing any professional voice recordings. So you’ll be all set if you also do voice over recording, record podcasts, narrate videos, etc.
Isn’t this stuff super technical and hard to understand?
You might have to learn some new things if you’ve never done much audio recording before. But the things you really need to know are not nearly as scary and difficult as most people think. In our articles and videos, we strive to get the point across using plain language and avoiding the usually incomprehensible audio jargon you find in most audio texts and tutorials.
You can get started with some free videos from our course The Newbies Guide to Audio Recording Awesomeness. But below are some basics to get you started.
Software
Your computer will be the centerpiece of your song recording studio. And as with so many things, there are tons of choices here. But I highly recommend a program called Reaper. It is a digital audio workstation (DAW), which means it is a multi-track recording program.
That makes it perfect for recording music. You can record one thing at a time in their own tracks, stacking instruments and vocal harmonies, etc. Add effects, mix, save your song, and you’re done. You can learn more about what a DAW is in our article What Is A DAW? It Means Digital Audio Workstation.
You might hear that a program (also a DAW) called Pro Tools (Amazon/B&H) is the way to go. But Reaper can do pretty much any major thing Pro Tools can, and it will only cost you $65! Yup. Reaper has two prices for THE SAME SOFTWARE. The “personal” license is $65. Start with that. The commercial license is what you would purchase if you are making a good deal of money using Reaper.
So if you were able so sell the music you record with Reaper in your song recording studio, then you should consider paying for the commercial license. But it’s up to you. It’s an honor system kind of thing. Who does that? Reaper does.
By contrast, Pro Tools (Amazon/B&H) will cost you $629!
Once you get your microphone hooked up (more on that below), just select that mic from Reaper’s settings, hit the “record” button, and you’re on your way!
By the way, some people think that the recording software itself makes a difference in the sound quality you get when recording. This is not true at all. The software does not determine how your recordings sound. It’s mainly about the stuff that happens before and during recording, such as the kind of mic you use. Speaking of microphones…
Microphones
If you will be recording songs with real instruments and/or voices (as opposed to strictly electronic instrumental music), you’ll need at least one microphone. The most cost effective microphone is a large diaphragm condenser mic, such as the Audio-Technica AT2035 (Amazon/B&H)

Large diaphragm condenser mics are versatile, working well on vocals and acoustic guitar, but also as a general purpose mic you can use for just about anything.
How To Plug Mics Into Your Computer
Standard mics like the AT2035 require an audio interface to connect them to a computer. You plug the 3-pin connector of standard mic cables into these small boxes (normally). And these boxes plug into your computer’s USB port. An interface unit provides preamps (preamplifiers), analog-to-digital converters, and phantom power for condenser mics.
There are a ton of interface units to choose from. Part of the decision will depend on how many things you need to record at the same time. I’ll start with interfaces that just have a single microphone input. This is fine for solo musicians like me who record one track at a time. So I would record a guitar track, then a vocal track, then a bass track, etc.

If you need to record more musicians simultaneously, you’d need to look at interface units that have more inputs. Check out the Focusrite Scarlett Solo (Amazon/B&H) for one excellent choice. As the name implies, it has a single mic input. That unit costs about $110.
If you need two mic inputs, the Focusrite Scarlett 2i2 (Amazon/B&H) is a good choice for around $160.
USB Mics
You can also use USB microphones, which plug directly into your computer without the need for a separate interface. These mics are definitely more cost effective, but the quality is not quite what you can get with the standard mic/interface setup.

One decent choice for an affordable large diaphragm condenser USB mic is the Audio-Technica AT2020USB (Amazon/B&H).
But there are tons of choices here as well. Be careful to make sure you choose the “USB” version of this mic though. There is a standard mic version of the AT2020 which would need an interface. This may be the fastest say to set up a song recording studio.
Mic stand
Of course you’ll need a mic stand to hold up your mic. These are usually about $20 or so. One think I highly recommend is to put any microphone onto a stand, even if yours came with a little desk stand like you see in the pic above. this will allow you to get your voice closer to the mic and stand up straight. You’ll be more comfortable and the audio quality will be better.
Pop Filter
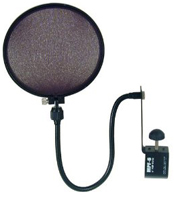
For any kind of vocal recording, you will need a pop filter. This is a round (usually) filter made of thin material that will help prevent p-pops in your recordings. Those are the low frequency “popping” sounds you get when you say the letter “P” or “B” (among other mouth sounds). They sound unprofessional and you definitely don’t want them in your songs. This is one of the many ways to improve sound quality.
There are lots of pop filters available. One choice is the Auray Pop Filter for about $19 (Amazon/B&H).
Fight the room sound
One of the most common causes of poor audio recording is the echo-y, reverb-y sound you get when recording in most standard converted bedrooms as your studio space. One way to combat that is to get your mouth close to the mic – about 3-5 inches or so.
In addition to that, you’ll want to so something to absorb sound in your room. The best way to do this would be to have a recording booth. But those are super expensive.
Another great way to reduce room sound is by placing foam panels on your walls. But don’t just put up any old packing foam. You need tuff that is specifically designed for the purpose, such as Auralex Acoustics SonoFlat Acoustic Absorption Foam Panels (Amazon/B&H).
Virtual Instruments and MIDI Keyboard
There are so many options for making music in a song recording studio in 2019. Virtual instruments are available for just about any kind of instrument you can imagine. Don’t know how to play trumpet? No worries. Get a virtual trumpet plugin and you can “play” it with a MIDI keyboard. Same thing with piano, drums, bass, etc.
You can find out more about using virtual instruments and MIDI in our video Intro To MIDI and Virtual Instruments.
The MIDI Keyboard
In order to play these virtual instruments, it’s helpful to have a MIDI keyboard. Even if you don’t play keyboards/piano, you can use the MIDI keyboard to enter notes into the MIDI editor in Reaper. That way you can just play a few notes at a time and build the part.
And then you can move the notes around to perfect it when you’re done. It really is amazing what you can do. Check out our cover video of “My Eyes” (from Dr. Horrible’s Sing-Along Blog). All instruments in that song recording, except the bass and the vocals, were virtual instruments.

Most MIDI keyboards connect to your computer with a USB cable. One example of a good quality, but very affordable MIDI keyboard is the Novation Launchkey Mini Keyboard Controller (Amazon/B&H). It only has 25 keys, which should be about all you need if your are just triggering notes on virtual instruments. But you can also get full-sized MIDI keyboards if you choose. That would allow you to actually play the keyboard like a piano.
Another great source for MIDI keyboards is Native Instruments’ Komplete Kontrol series. They have keyboards of several different sizes and capabilities. You can check those out here.
Virtual Instruments
If you want a song recording studio that can produce a huge variety of sounds, virtual instruments are a must, in my opinion. So what are some good options for virtual instruments?
Instrument Players and Soft Synthesizers
There are several all-in-one sort of solutions, where you get a “player” that can load instruments. these often come with a library of their own instruments, as well as allowing you to play 3rd-party instruments.
One of the most common players is Kontakt Player, by Native Instruments. They have a free version at that link above, which plays all Kontakt instruments, as well as several from other companies. You can find loads of free instruments on their site here.

Another one of my favorite virtual instruments comes with hundreds of instruments and sounds. It costs a bit more but it is amazing. It’s called Omnisphere (Amazon/B&H). It has its own player where you load and tweak all the instruments in its vast library.
One other virtual instrument package I use a lot, and is featured in the My Eyes cover recording, is called Garritan Personal Orchestra (Amazon). It comes with several orchestral instruments all part of the package. It is priced at about $119, between the free Kontakt player and Omnisphere.
Plug-In Instruments You Can Play In Reaper
And then there are many instruments that you don’t need any container or player software for. These are designed as plugins – usually VSTi plugins – that you can open on a track in Reaper or any DAW. One example (of the hundreds out there) that is free and I use all the time is a piano instrument called 4Front Piano. It’s free.
After you download it, tell Reaper where to find it on your computer. Then you just open a track in Reaper, click the FX button, load 4Front Piano, and you’re done! Just choose your MIDI keyboard on the track control panel and you’ll be able to hear the piano when you hit the keys on your MIDI keyboard. Then you can edit them in the track’s MIDI editor. It’s all in our video
Intro To MIDI and Virtual Instruments, which is an excerpt from our course, The Newbies Guide To Audio Recording Awesomeness 2: Pro Recording With Reaper.
Drums
No song recording studio would be complete without some way to record drums. Obviously you can record real drums if you play and have a kit. But if you don’t, you can use virtual drums just like any other virtual instrument.
There are lots of ways to record virtual drums. You can get some that work with Kontakt. And Omnisphere has some drums. But I like the stand-alone drum programs. For example, I use Storm Drum a lot. I used it in my cover of That Thing You Do.
You can hear the song and see the video I made of me doing that song. I even showed the MIDI editor “playing” the drums in the video, which you can see in our article Cover of “That Thing You Do” – Record a Rock Song on Your Computer.
But programs like Storm Drum can be expensive. You can actually just find single-hit drum samples and create your own drum kit right in Reaper. It takes a bit of work but it’s free. I show you how to do that in our Reaper Course.
There is also a free program that looks promising. I have not tried it personally, but you can check out MT Power Drum Kit and give it a try.
You’re On You’re Way
So that’s basically it! With just the things mentioned in this article, you can easily set up a song recording studio at home. I’ve recorded over a dozen albums using nothing but my computer and the things I listed here. Of course, you can expand as you need to.
Check out our course, the Newbies Guide To Audio Recording Awesomeness 2: Pro Recording With Reaper Software, to get started.
Now go record lots of music!
Free videos from “The Newbies Guide to Audio Recording Awesomeness”

[…] you’d like to see the details how how to set up your own song recording studio at home. Check out my article Song Recording Studio: How To Set One Up At […]