Improve The Quality Of The Audio You Record At Home – Tip 4
We’ve been doing a series of articles and videos showing you how to produce better sounding audio even in (especially in) bad-sounding rooms, such as the converted bedrooms that so many of us use as home recording studio spaces. You can read the first post in the series if you have not seen everything in order yet. Today marks the fourth week and fourth tip to help you sound more professional. This one is applicable primarily to vocal recordings – for voice-over or for singing. It’s time to tame the dreaded p-pop!

Whenever we record words with a “P” or “B” in them, we’re creating a sound that linguists call a “plosive.” But when recording into a very sensitive microphone such as a large diaphragm condenser (LDC), which is probably the most common type of vocal recording mic, these plosives tend to create an unpleasant burst of low-frequency noise sounding like a small explosion. Sensitive microphones don’t like sudden blasts of air, so the result is an excessively loud plosive often called a “p-pop.”
Can’t I Just Use A Pop Filter?
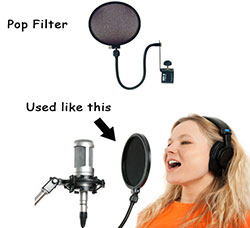
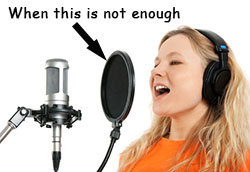
It’s common practice to use a pop filter when using an LDC mic. You place them between your mouth and the mic to help tame the p-pops. But some still get into the recording. And if you are recording in a poor sounding room, our first tip – getting your mouth 3 to 4 inches from the mic (unlike the girl in the picture on the right) will instantly improve your sound. However, even with a pop filter in place, getting that close to the mic will increase the problem of p-pops.
So though you can use a pop filter to help minimize those misbehaving plosives, you have to make peace with the fact that some will end up in the recording.
So what do you do now? You edit. You can fix p-pops using audio software after they have already been recorded. I tend to use Reaper for all my recording needs. However, though you CAN use Reaper to fix p-pops in an audio file, it is pretty time-consuming and cumbersome, as you’ll see in the video above. This is definitely a job for an audio editor, such as Audacity, Adobe Audition, Sony Sound Forge, etc.
In the video, you’ll see how much faster and easier it is to use an editor. I demonstrate how to do it in Audacity, which is free. So hey, once again you get a tip that won’t require you to buy or build anything. That’s four for four!
But this is too slow and I’m willing to pay to speed it up!
If you DO have a budget and need to REALLY speed this up (it can take a long time if you hav a long voiceover job!), you might want to check out iZotope’s RX Standard. It has a “De-Click” tool (along with several other amazing tools like de-noise and plosive remover, etc.) that can get rid of all clicks in a selection without messing up the res of the audio. CLICK HERE to find out more or purchase it (download) from Amazon.
Here’s the part 5 of the series.
Free videos from “The Newbies Guide to Audio Recording Awesomeness”

Hi,
You mentioned rendering the clip after you edited it. I don’t know if rendering audio is as slow as rendering video, but as you add different elements it takes longer and longer to render. I have a fast quad core computer that takes an hour to and hour and a half to render a 5 minute video clip. Any suggestions to speed up the rendering process? I know I could render at a lower quality to speed things up but I don’t really want to do it figuring if I render once converting to lower quality later is quick and I’d rather do that.
Looking at the Windows resource guide I see that the thing that is tapped out and running full capacity is the hard drive. Since SSD drives are coming down I was thinking about how to use that to speed up rendering. Most people use the SSD to speed the boot process (I really don’t care if that takes longer) I want to speed up rendering. Any suggestions?
Thanks in advance for your help.
All the best,
Ted
Ted – rendering audio is nowhere near as long as editing video. For example, that one line took about 1 second to render. When rendering a full mix of a song that is, say 24 tracks, with virtual instruments and lots of bells and whistles, it takes maybe 2 minutes at the max. I know what you mean about rendering video though. I have a measly i5 processor on my main computer and it takes 15 to 30 minutes to render an 8-minute video. But that can be made faster by using different CODECs. For example Sony AVC usually renders much faster than MainConcept CODECs, etc. And if you’re rendering for YouTube, using QuickTime is faster still. I hope that helps.
Ken
Hi Ken,
Thanks a lot for the info. I really like your tips. I thought the improvement in the first one, simply moving closer to the mic really made a dramatic improvement. Since you are recording the “before” tip and “after” tip audio clips it really drives the points home.
Any suggestions for recording Skype conference calls in both audio and video. I’ve tried several pieces of software and the quality leaves a lot to be desired. Sometimes one party on the conference call turns out better than the other and often it is the remote side that comes out better. And he is using his laptop with its built in mike! Equipment-wise I should be a lot better but sometimes surprisingly it is worse. Sometimes the same thing happens when I’m trying to record video. Thanks again for any suggestions and your help.
All the best,
Ted
You’re welcome! And thanks for the kind words, Ted. I haven’t done Skype recording in awhile. But one great way would be to use Camtasia Studio, by Techsmith. (or other screen-capture software). Camtasia can record both “system audio” and your microphone to separate tracks. If it’s a short call (5 minutes or less I think), you could use Techsmith’s free program called Jing. I hope that helps!
Ken