Fixing mistakes while recording so that we can continue, rather than start over every time, can be a huge time-saver in the studio. It can also be a sanity-saver. The most common way to do this goes back to the analog tape recording days, and is called punching in/out. This means that we stop recording, and on the same track, record over the mistake and continue on.
But I find it much easier and faster (and who doesn’t like our good friends, easier and faster?:)) to use a process called overdubbing, which basically means recording the same part on another track, to do this instead.
Computer recording – where we can SEE the audio, as well as hear it – has made overdubbing for something like this much easier than in the old days. I’ll show you how to use overdubbing to fix a mistake (or a guitar buzz, or dog sneezing, etc.) so you can continue recording quickly, leaving no sign that there was ever a mistake – seamless audio “patching.”
I’ll use Reaper software, but the process is the same with any multitrack recording software (sometimes called a digital audio workstation, or DAW).
Few of us are capable of recording a performance perfectly from start to finish. Even if you often perform live, things change when you’re in the studio to actually record instrument or vocal parts. We’re bound to make mistakes.
And If we’re talking about voice-over recording, especially long scripts like audio books, then it’s almost a given that you’ll have to stop somewhere to pick back up later. Rather than using the punch in/out method (which only uses a single track), we are going to start a second track underneath our main track.
Also, there are two situations when this procedure works really well: 1. When your want to fix mistakes as they happen and have a perfect track when you’re done; and 2. When you don’t want to stop and start, but would rather go back and fix the mistakes after the part is recorded.
Fixing the mistakes as they happen
When recording a part that is being tracked to a tempo, as you would when recording a part for song, you almost have to stop when you make a mistake, fixing each as you go until you either finish recording the part, or make another mistake.
This is because everything has to happen at a specific point on a timeline and it can be very hard to recover, and get back on track, after making a mistake. Also, if you’re like me, you’re brain knows you made a mistake and that knowledge can make it hard to focus for the rest of the recording.
So here is how it is done.
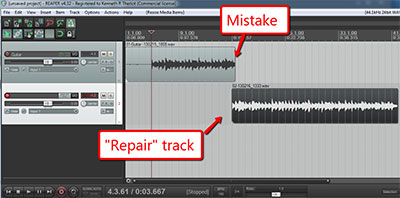
Start recording your part on a track you’ve labeled “guitar” (or whatever). I’ll use a guitar part for this example. Begin recording until you make a mistake, or there was a noise, or whatever. Then stop the recording and save what you have on its track.
Next, create a new track underneath the “guitar” track. This is where you will record your repair audio.
Be sure to disarm (click on the little red button in the track control panel to turn it off) the guitar track so you don’t record over what you have.
Then arm the second track (click the little red button to turn it on).
Shorten the very end of the first part so you can’t hear the mistake (and in my case, a swear word or two:)) when recording on the “repair” track. It will almost certainly throw you off. In Reaper, you can simply click on the ending edge of the 1st guitar part and drag to the left until the mistake (and/or swear word) is gone.
Now just put the cursor a few seconds in time before the new end of the guitar track. 5-10 seconds should be plenty to allow you to start playing along with the first part.
Start recording again, listening to the guitar track recording in headphones. For the first few seconds, you’ll be playing along with the guitar track, and then it will drop away whi8le you continue to play and record. Keep recording until you finish, or until you make another mistake.
Now drag the beginning edge (on the left) of the repair recording to the right (getting rid of the part that overlaps) until it corresponds with the end of the guitar track above it.
Move the entire repair part up (click anywhere in the middle of the recorded part and drag) into the guitar track so that it picks up where the original leaves off.
Make sure the new part overlaps the old part by just a couple milliseconds so you can used cross-fades to create a seamlessly smooth transition.
Repeat until the part is done.
Here is a video showing the process, which will make it more clear if the above was at all confusing:
This was how to fix mistakes as they happen. In part 2 of this article, you’ll see an alternate way to use overdubbing to fix mistakes after you’ve recorded the entire track.


Ken thank you so much for the great tips you make this look so easy!
Thanks Sunny. Making it look easy is my primary goal, so I guess it’s working;).
Cheers,
Ken
Thank you for easy and clear explanation!
You’re welcome, Joe. Thanks for that feedback!