Simple But Awesome Reaper Snap Setting
The Reaper blog just published a post about a setting I didn’t know about, and it really helps me a lot! It’s called the “Snap Relative to Grid” setting.
How I used to use the snap tool
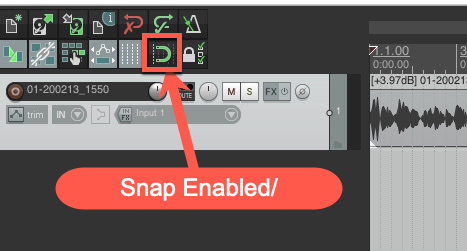
In a lot of my tutorials, I warn people to pay attention to whether the Snap tool (looks like a magnet – see the pic on the left) is enabled or disabled. It’s incredibly useful when you want to snap the edges of your item to a gridline (which can be bars/beats, or minutes/seconds, etc.). But if you are trying to nudge something just a bit to the left or right on a track, having the Snap tool enabled will be trouble.
One problem I run into quite a bit is when I am dragging a bit of audio from one track to another. I don’t have a very steady hand (so you don’t want me doing brain surgery on you :)), so I almost always manage to slip the audio a bit left or right when I am just trying to drag it up or down.
Of course, this will mess up the timing, and I often find myself undoing (“ctrl-z” is the best keyboard shortcut EVER) and trying again. Or I drag the edge of the audio item out beyond its actual start or stop time to get it to line up with a gridline, then turn on the Snap tool, then drag it up, then turn off the Snap tool. Craziness, I know!
In my mind, I knew there was a way to keep the audio aligned in time while dragging to a different track, but I’m lazy, so I never looked it up.
So what is “Snap Relative To Grid?”
Well, it turns out the answer is “Snap Relative to Grid.” You just go to the Snap/Grid settings (right-mouse click on the Snap tool) and put a check mark in the “Snap relative to Grid” box. That way, if the edges of your audio happen to fall between gridlines, and you want to drag the audio up to a different track, the edges will stay aligned with however far away the audio was from the nearest gridline to start with.
In a nutshell, this means you can drag your audio clip up to a different track without worrying about it slipping left or right (earlier or later in time) in the process. In other words, it’s the right tool for the job I’ve been doing the hard way for years. Yay!
Here is Reaper’s blog post about it, along with an animation that shows you both how to select the option and what it does for your audio item when dragging it up or down to a different track. Hope this makes you as happy as it makes me :).
Hey Ken! You just gave me an idea for another article, re: moving tracks up and down without losing the time position. Hint – mouse modifiers.
Awesome! I love learning about these little things that make such a huge impact on workflow in the studio! Thanks for the post and I’m so glad I could inspire yet another tip:)!
Cheers!
Ken
There is also a command in the actions list called “Item edit: move items/envelope up one track/a bit” which I use all the time instead of dragging by hand. No worries about left/right movement at all with this shortcut. (There is a “move items down” action as well.)
Very handy for comping takes.
Thanks John!
Highlight item press key 8 to move up 2 to move it down a track
Thanks Anton. so what do you mean by “key 8” and “key 2”? Because just hitting those number keys doesn’t do anything. Neither does F2 or F8.
Anybody know how to enable snapping to the notes of the key in reatune… on Kenny’s instructional video it says when in manual mode and a key selected the drawn in lines for the notes should snap to only notes that are in that key….. mine however allow placement anywhere which is time consuming as I have to zoom in to make sure i am placing them exactly in the middle of the correct note….. is there a preference that I am missing somewhere ?
I’ll check on that, Simon. I’ll post back here when I know the answer.
I wish there was a simple key command to snap to nearest grid line, and make two notes snap to same length. Quantize doesn’t always seem to work right even if you have move left, right , shrink grow checked.
Yeah, I agree. I assume you’re talking about the MIDI editor. I don’t know that this ability does NOT exist. I’ve never dug into much since I don’t do a ton of MIDI stuff. But I can ask on the forum.
Hi Lenny. So I did some snooping and hopefully this will answer your questions.
There actually is a snapping tool in the MIDI editor. Just make sure that’s on. So first go to Options > Snap Settings > Snap notes/cc to grid. Then use the option of Always snap notes to the left. But the default grid is set to 16th notes. So they will only snap to the nearest 16th note. If you want it to snap to 8th or quarter notes, change the grid on the bottom left part of the MIDI Editor. It’s easy. It just says “Grid” with a dropdown menu where you can change from 1/16 to 1/8 or 1/4, whatever.
For making all the notes the same length, right-mouse click and drag over the notes, which will select them all. Then select Event Properties in the menu that comes up. Make sure “Type” says “Notes” and put the note length in the “Length” window. They default to using a decimal number system:
0.1.00 is a quarter note
0.0.50 is an eighth note
0.0.25 is a 6th note
0.0.13 is a 32nd note
But you can just put in 1/4 for quarter notes, 1/8 for 8th notes, 1 for whole notes, etc. Then all the notes you have selected will change to that length. That should do what you want. Hope that helps!
For users of more recent REAPER builds there’s a Mouse modifiers action for Media Item context: Move item -> Vertically
Thanks!