Audio Normalization: What Is It And Should I Care?
If you’ve heard the term “audio normalization,” or just anything like “you should normalize your audio?” you may well wonder “what the heck does that mean? Isn’t my audio normal? Do I have abnormal audio?” And you would be right to wonder that. Because the term is not really very self-explanatory. So what else is new in the audio recording world?
Here is a quick animated gif that kind of explains what normalization (technically, this is “peak normalization”*) is in 2 seconds.

To answer the questions in the title – let’s take them one at a time, but in reverse order, because it’s easier that way:).
Should I Care What Audio Normalization Is?
Yes.
That was easy. Next.
What Is Audio Normalization?
You COULD just use the definition from Wikipedia here. But good luck with that. As is typical with audio terminology, that definition is super confusing.
It’s actually pretty easy to understand and not really that easy to put into words. But I’ll try. When you “normalize” an audio waveform (the blobs and squiggles), you are simply turning up the volume. Honestly, that’s really it. The only question is “how much does it get turned up?”
The answer to THAT takes just a little tiny bit of explaining. First, let’s recall that with digital audio, there is a maximum volume level. If the audio is somehow pushed beyond that boundary, the audio gets really ugly because it distorts/clips.
Some Ways That Digital Audio Is Weird
This maximum volume level I mentioned is at 0 decibels (abbreviated as “dB”), by the way. Digital audio is upside down. Zero is the maximum. Average levels for music are usually between around -13 dB to -20 dB for short. Really quiet levels are down at like -70 dB. As the audio gets quieter, it sinks deeper into the negative numbers.
Yeah, digital audio is weird. But as long as you buy into the fact that 0 dB is the loudest the audio can get before clipping (distorting), you’ll know all you need to know.
Some Ways All Audio Is Weird
In case you didn’t know this, sound/audio is caused by waves in the air. Those waves cause air molecules to vibrate back and forth. The way a microphone is able to pick up audio is that those “air waves” ripple across the surface of a flat thing inside the mic. That causes the flat thing to move back and forth (in the case of a dynamic mic) or to cause back-and-forth electrical pressure in the case of a condenser mic. For more detail on this, check out my post What Is the Difference Between Condenser and Dynamic Microphones?
So What Is The Weird Part?
Audio waves show up in audio software in a weird sort of way. For instance, you might expect the quietest audio to be at the bottom and the loudest to be at the top. But that isn’t the way it works with audio.

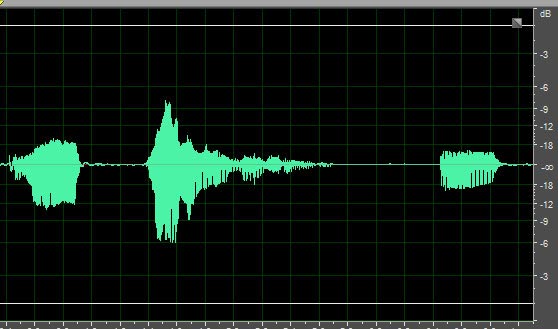
Because of the fact that audio comes from waves – the back-and-forth motion of air molecules – the loudest parts of audio are shown at the top AND bottom, and absolute silence is in the middle. Since pictures make things easier, see Figure 1.
So rather than thinking of the maximum allowable volume level as a “ceiling,” which is what I was going to do, let’s think of it like a swim lane. And in this swim lane, BOTH edges are boundaries not to be crossed.
This also means that when looking for the loudest part of your audio, you have to look both up AND down. Admit it. That’s a little weird. As it happens, the loudest part of the audio in our example below is in the bottom part of the audio.
Normalization Math
OK, back to normalization. Let’s get back the the question of how much audio is turned up when it’s being normalized. The normalization effect in audio software will find whatever the loudest point in your recorded audio is.
Once it knows the loudest bit of audio, it will turn that up to 0 dB (if you are going for the greatest amount of normalization). So the loudest part of your audio gets turned up to as loud as it can be before clipping.

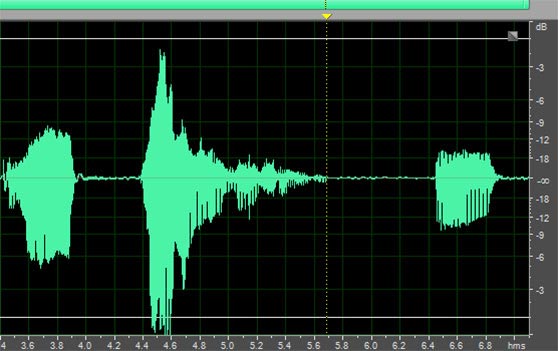
Let’s say the loudest part of your audio, which is a vocal recording in our example, is a part where you shout something. See Figure 2 for an example.
And let’s say that shout is measured at -6 dB. The normalization effect will do some math here.
It wants to turn up that shouted audio to 0 dB. So it needs to know the difference between how loud the shout is, and the loudest it could possibly be before distorting.
The simple math (well, that is if negative numbers didn’t freak you out too much) is that 0 minus -6 equals 6. So the difference is 6 dB.
Now that the software knows to turn up the loudest part of the audio by 6 dB, it then turns EVERYTHING up by that same amount.
Let’s look at a “before” picture of our example audio.
And here is what it looks like AFTER normalization.
Other normalization settings
While most people use to raise the overall volume of their audio, you can ALSO turn audio DOWN with normalization. Remember, all the program is doing is changing the level of the loudest bit of audio to a target you choose, and changing all the rest of the audio by that same amount.
So that means if you place the setting to a target that is LOWER than the loudest part (the shout in our example above), the normalizing will turn everything down by the amount it takes for the loudest part to meet the target.
So let’s say the loudest part of your audio – the shout – is at -2 dB. If you set your normalization target to -3 dB, then the effect will LOWER everything by 1 dB, which is the amount of reduction you need to get your -2 dB peak down to -3 dB.
So why would you want to do this? Certain services have maximum loudness standards. For example, if you are recording an audiobook for Audible (using their ACX marketplace), they will not accept audio that has a peak level above -3 dB. That means our audio with the shout that goes as high as -2 dB breaks their rule because that is louder than -3 dB. So you can use normalization to reduce your loudest peak by setting the target to just under -3 dB, like say -2.99 dB.
Targets as percentages
A normalization effect might offer percentages as targets as well as specific dB targets. For example, normalizing to 100% is the same as raising the volume to the maximum of 0 dB.
A 50% target will be roughly equivalent to -6 dB. Yeah, another thing about measuring audio is that it isn’t linear. For example, a 30% target is about -10 dB. 90% is -1 dB. 80% is -2 dB. 70% is -3 dB, 60% is – 4.5 dB, etc.
I know. More weirdness.
The point here is that if you use a percentage, might be setting the max loudness to lower than you think. If you have a choice to specify the actual dB level, do that. It will make things much easier to understand.
Why Is It Called “Normalization?”
The reason this became a thing was an attempt to make different songs (or other broadcast audio like TV, radio, etc.) sound more even. The thought process was that if the loudest part of each song was the same, they would sound closer to the same volume. I still don’t think the term of “normal” is very self-explanatory for this. But there you are.
That’s It?
Yeah. That’s it… for THIS type of normalization – called “peak normalization.” Which is what most people mean when they just use the term “normalization.”
* But there is another kind of normalization called “loudness normalization.” People started realizing that even if the peak bit of audio was the same for 2 songs, one could still sound WAY louder than the other one if its average volume was higher. And you can do that just by compressing it (See my article What Does Compression Mean In Audio Recording? for more on what that means). So in order to prevent something being louder just because it was more compressed, it was decided that “normalizing” (making something about them all the same) the average volumes was a better thing. So the targets were “average volume” of a song rather than the loudest peak. See the loudness and loudness normalization section in the Wikipedia article for more.
Remember I said that audio normalization was really just turning it up (or down)? I know it took a fair amount of explaining, but yeah. The only reason to normalize your audio is to make sure that it is loud enough to be heard (but not so loud the listener must turn it down), and potentially, make all your songs sound closer to the same volume. That could be for whatever reason you want.
Use With Caution
As I have preached again and again, noise is the enemy of good audio. Before you even normalize your audio, you’ll want to be sure you’ve gotten rid of (or prevented) as much noise as possible from being in your audio recording. See my post series on how to do that here: Improve The Quality Of The Audio You Record At Home.
The reason it’s so important is that by normalizing your audio, you are turning it up, as we have seen. But any noise that is present in your recording will ALSO get turned up by the same amount. So be very careful of that when using this tool. Audio normalization is powerful, and so can also be dangerous.

Nice explanation!
Thanks!
Ken is not only a musician and music writer, he is an excellent teacher and speaker.
Thanks so much for the kind words, Shah!
Yes, a nice and simple explanation, with clear supporting images. Well done! This could be a nice preamble to then explain what dynamic processors like compressors can do beyond this point, helping to tame those loud parts of the audio so the rest can be turned up even more.
Thanks Karim! I thought I had something like this on compression as well. Let me check and I’ll put some links here. Here is one that’s fairly recent: https://www.homebrewaudio.com/using-audio-compressor-voice-over-jobs/ It talks about using compression for VoiceOver stuff, though the concepts are the same regardless of whether it’s for music or spoken word stuff. Here are a few other posts I did about compression: Improve Or Ruin Your Audio With an Effect Called Compression, and Vocal Compression Using Reaper’s ReaComp Effect Plugin.
Awesome, I am going to read those! I have invested a lot of time in learning dynamic processors and enjoy every article about it. I expect your posts will be as good as this one, so definitely adding them to my bookmarks! Thanks for the links!
Awesome! Let me know if you have any questions.
So where in the process do you normalize? Lets say you arr working with 4 waveforms in your DAW; a vocal, an acoustic, bass and drums. You have 4 tracks. Do you normalize each independently, Pre or post production, effects, etc? Or do you normalize the final mix?
the purpose of normalizing is really just to make sure the audio in file is at its own loudest possible volume (level). But since it is risky to just turn up audio without also turning up potential noise, I usually edit each file at least to make sure there isn’t a lot of noise in it first. So I edit first (de-noise, if it’s a vocal I remove mouth noises and possibly de-ess). Then I normalize it after. But if you’re working on a multitrack song in a DAW, and the level of the audio on a certain track is already sufficient, you may not need to normalize it at all. I don’t normalize EVERY track in a song if the levels are fine already. But when I’m working on a spoken-word/voiceover recording where the voice is the ONLY thing being produces, I always normalize it to make sure the person on the other end has the best chance of it being loud enough on their system without distorting/clipping. Hope that helps.
[…] exactly what the tool called Normalize is for. See my post Audio Normalization: What Is It And Should I Care? I simply select the entire file and click on the Normalize tool in Audition. I always choose the […]
[…] I can increase the volume of the entire file now without anything distorting. If you want to maximize the overall volume, you turn up the entire audio waveform until the loudest bits reach the upper limit (0 dB). That's known as "normalizing" audio. See my article Audio Normalization: What Is It And Should I Care? […]
[…] there are several ways. Tools you can use include a combination of Normalization and Amplify tools in Audacity. But to really understand this, it helps to think about your school […]
Much, much appreciated!:)
Just a word of caution: Peak normalization of your lossless audio files will not make them all sound roughly as loud as each other.
You need to normalize to an average level(RMS, LUFS, or some other standard), so that when playing back audio files from different time periods, artists, and genres, you will not have to change the volume control frequently because of a super loud song or one that is really soft.
Is there software that does that for LOSSLESS(Wave, FLAC) audio files?
Very true. In order to “normalize” two audio files, you need to use avg perceived loudness. This can be done in Adobe Audition with the Amplitude statistics window using the LUFS value at the bottom.