How To Make My Recording Sound Professional Quickly
This may sound like one of those click-bait headlines. But of the many ways to make a home audio recording sound professional, there really is one fastest (like immediate) way. And you can do it right now.
Podcast and Voice-Over Recording
Probably the most basic and most common kind of recording is the spoken voice. With music production, there are dozens – maybe hundreds – of ways to make things sound more professional. But really, there are just a handful of things to get right if you want your podcast or voice-over (or audiobook, videos, etc.) sound more professional. So let’s start there.
If I had only 5 seconds to impart some knowledge on how to make your recording sound professional, it would be this. “Get your mouth close to the microphone.” How close? Less than 5 inches. I usually shoot for 3-4 inches.
Why So Close?
Most of us are recording in a square room – a home office or studio in converted bedroom at home. That means a square or rectangular room. And THAT means lots of room reverb, which is probably the biggest, most common contributor to amateur-sounding home recordings.
The only people who would NOT necessarily benefit as much from this are those who really know what they are doing with acoustic treatment – meaning audio absorbing panels AND diffusion. Those folks don’t have the problem with room reverb, so they can stay a little further away from the mic and still get a nice pure vocal sound.
And of course someone recording in a professional recording studio would have the same advantages of properly treated recording spaces without having to be an acoustics expert.
But a vast majority of content creators are recording in rooms at home or offices, which are almost designed to have bad acoustics – due to that square or rectangular shape. So that means most people reading this post right now.
Can I hear for myself?
So blah, blah, blah. I can tell you the technical reasons or mention stats all day long. But it’s better if you hear for yourself.
I recorded a bit of audio in a typical room – the guest bedroom in our house. I used an Audio Technica ATR2100 USB microphone – a pretty cheap mic – for BOTH of the following recordings. I’m not recommending this mic, BTW. But it demonstrates how even a cheap mic can sound pretty decent if you use it right.
The first was with the mic on a desk in a very common setup – about 18-20 inches from my mouth. The second one was the exact same chair, desk and room with the same mic 3-4 inches from my mouth. This will be more dramatic if you listen to the following samples in headphones.
18-20 inches away
3-4 inches away
Notice 3 things:
- The audio quality of the close sample is much better. The voice sounds richer with more depth.
- There is a lot more noise in the far away sample. And
- There is tons of room reverb in the far sample and very little in the second one.
Also, I did no editing of either sample – no noise reduction, EQ compression or anything at all beyond making their volumes the same.
That is a massive difference. And the only thing I did was get my mouth closer to the mic.
How Can I Set This Up Permanently?
As easy and immediate as it is to put your face 4 inches from the microphone, you will probably have to make some changes to make it easy to ALWAYS get and keep close to it.
So if you currently have a mic on a desk stand, it is probably too far away. And getting and KEEPING your mouth close to it probably would require you to hunch over and lean forward. It isn’t really feasible to stay in that position for any length of time. And whether you are singing or speaking, that’s just about the worst possible position for your body to be in. Hard to breathe. Harder to control volume and tone, etc.
Get The Microphone Off The Desk
So the solution is to get the microphone off the desk and put it onto a mic stand. If you are using a Blue Yeti – or any other mic that comes attached to its own desk stand, you’ll have to remove it from that stand, which is easy to do.
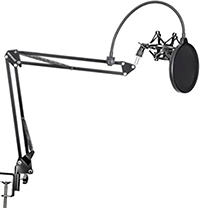
Desk Swivel (or “Scissor”) Boom Stand
Then you’ll want to put the mic onto a mic stand that is adjustable. One of the best ways to set this up is to get a desk scissor boom stand. This puts the mic onto an adjustable “arm” with a joint that allows you to push, pull, raise and lower the mic without having to loosen and tighten knobs or anything. Just push it away and up when not using it. Then pull it down and close when you need it. Here is what that looks like.
The alternative is to get a floor boom stand, which go for 20 or 30 bucks. Then you can put the mic stand off to the side of your chair with the boom arm pointing straight up when not using it, and adjust it to come down in front of your face when you need it. These do have a knob you have to loosen and tighten to make adjustments. So it’s just a little less convenient than the desk scissor boom. But still super convenient and does the job.

Some Tradeoffs
Now that you’ve incurred some little cost and effort to comfortably get and KEEP your mouth close to the mic for all recording sessions – even the long ones – there is something else you’ll need to address. When you get your mouth close to the mic, it improves the tone of your audio and reduces room reverb.
BUT the mic now also picks up some mouth noises that weren’t there – or weren’t that noticeable – when you were far away. Namely – plosives (sometimes called p-pops) and mouth clicks – the wet saliva noises from your tongue and lips.
So we need to get rid of those. Fortunately it’s easy and fast to do. But it will require that you do some minimal editing with some recording software. Pretty much any audio recording program will work except GarageBand, which I don’t recommend using anyway if you are going to be using your voice for professional purposes.
The free way to remove plosives involves something that most programs have – including Audacity, Reaper and Adobe Audition and most others. It’s called EQ or Equalization.
For Plosives
Check out my post – How to Fix a “P-Pop” in Your Audio With A Sound Editor.” This post shows you how to do it this way, which is free. BUT it also takes awhile since you have to do them surgically, 1-by-1.
I got by using method for years until de-plosive tools became available and then I started using those. You can use a de-plosive tool on an entire audio file – no matter how long – and it will get rid of the p-pops all at once. So that will save you a ton of time, especially if you are recording long podcast episodes or audiobooks.
I use iZotope RX Standard – which is an entire collection of editing tools, including de-plosive. If you will be doing lots of podcasts or voiceovers, I highly recommend getting RX Standard.
It does tend to be pricy though. I recommend getting RX Elements for $99 first. It doesn’t have a de-plosive, sadly. But iZotope will let you upgrade to Standard for a less expensive price when they run their promotions several times per year.
Weirdly, there are no other de-plosive plugins on the market that would allow you to JUST get that tool by itself. If you know of one or hear of one, please contact me and let me know.
For Mouth Clicks
For mouth clicks, the same two things are true – you can do it for free using EQ. But it takes awhile. Or you can buy a plugin to take care of them all at once.
As with the plosives, I have a post for mouth clicks also – “How To Use An Audio Editor To Remove Saliva Noises/Mouth Clicks From Voice Recordings.”
There IS a DeClick tool in RX Elements that might work for you. But RX Standard has Dialogue DeClick, which is really perfect for this job. So again, the tradeoff for “quick” is “money.”
That is How To Quickly Make Your Voice Recording Sound Professional
So now you know how to immediately improve the quality of your audio – get close to the mic. But as with so many things, you end up with a few different problems with your mouth that close. Fortunately there are excellent ways to fix those. And the result – professional sounding voice recordings – can only otherwise be had by recording in a room that is properly acoustically treated, which requires more money, plus expertise and time – or by going to a professional recording studio, which is much more expensive than any of the other options.
Thank you for this valuable information. I am a”trial and error” guy and you have saved me lots of trials,
Glad it was helpful!
I am from Bangladesh. A vocal artist. I have planned to purchase a ROAD MXL NT2-A CONDENSER MICROPHONE. AS I HAVE A VERY SMALL HOUSE AND NO MUSICAL INSTRUMENTS, I USE STARMAKER APPS WHERE LYRICS AND TRACKS ARE AVAILABLE. NOW MY QUESTION IS HOW I CAN USE THIS CONDENSER MICROPHONE ATTACHING WITH A PHANTOM POWER SUPPLY BOX AND SING IT ON MY MY BILE PHONE. PLEASE COOPERATE. BECAUSE I AM A LITTLE BIT CONFUSED WHETHER IT CAN FULFILL MY DREAM OR NOT. THANK YOU
Can you clarify the mic you have? Do you mean a RODE NT2-A (which is actually my mic)? Also, did you mean “mobile phone”? If so, what kind of phone?
You cannot record that mic to a mobile device. Your best bet would be a USB mic (like the RODE NT-USB+) if you want to record onto a phone. But I don’t know about Starmaker apps – if it lets you record to a phone. But they seem to make computer apps too. So if you can get the Starmaker apps onto your computer, you can use your NT2-A. But you’ll need a recording interface (which has phantom power) like a Focusrite Scarlett Solo. JUST a phantom power supply box is not enough.