Voice Recording Studio In Your Bedroom
It’s easy to create a voice recording studio in a bedroom at home in 2021. Using a computer and just a couple other small bits of gear, you can easily record professional sounding voice overs at home.
Most people think you need to have a super expensive microphone to make really top-notch voice recordings. Either that, or they think you need to go to a professional voice recording studio.
Fortunately, neither of those things is true.
So why do so many people make such poor quality audio recordings at home? The answer is almost always this: a lack of knowledge.
I’m not saying you need to be an audio recording engineer to create professional audio at home. But there are some basic things you should know.
Without the basic understanding of a few simple things, even the most expensive microphone in the world won’t help you make professional sounding voice recordings. But if you DO understand these few important concepts, you can make even a really cheap microphone sound good.
So What Do I Need To Know?
Simply put, you need to know how to prevent and/or remove noise in your voice recording studio. When I say “noise,” I’m referring to any sounds that you do NOT want in your recording.
I assume the thing you DO want in the recording is your voice. That means anything that is not your voice is noise. Major examples include:
- Room sound – reverb and echo from your voice bouncing off the hard surfaces of your room
- Electronic noise like hiss or crackling sounds
- Extraneous noises
- barking dogs,
- crying babies,
- air conditioning blowers,
- mouth noises (p-pops, saliva clicks, slip smacks, etc.)
That pretty much sums it up. If you know some of the main reasons why these noises happen, and then know how to either prevent them, or fix them if they do get recorded, you’ll be able to get the best quality possible from even the cheapest microphones.
Where do I Find This Knowledge?
I put together a 6-part post series that will teach you how to improve the audio you record in your voice recording studio. That starts with the first tip here: Improve The Quality Of The Audio You Record At Home.
As the title suggests, most of the tips are things you can put into action immediately, without having to buy any gear or build anything.
You’ll learn things like how to use software (even free software) to get rid of noise in your recordings, since it is pretty darned impossible to prevent absolutely every possible noise from being recorded.
You’ll also learn some super simple things to do with a microphone that can make a huge difference. In fact I’ll give away the first tip right now. It’s simply – get your mouth closer to the mic.
I know! That sounds WAY too simple to make any kind of real difference doesn’t it? Well you can hear the difference for yourself in the video that accompanies this tip in the guide.
Hey, What About Those “Couple Of Other Bits Of Gear”?
Oh you remember that? Yes, in the first part of this article I said “Using a computer and just a couple other small bits of gear, you can easily record professional sounding voice overs at home.”
You probably have guessed by now that one of those other bits of gear is a microphone. Yes, you’ll definitely need one of those. But what kind?
I’ll assume that you’re just starting out and probably want things to be simple at first. So I recommend a USB microphone.
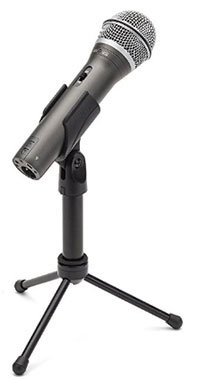
USB mics are great because you can just plug them straight into your computer’s USB port and start recording. But don’t just grab any old mic with a USB plug on it. You need something that will make you sound like a pro. There are lots of choices for lots of prices. But I recommend starting with the Samson Q2U, which is only about $50.
If you’d like to hear a voice recording I made with a Samson Q1U, check out my post Voice Over Recording Using Audacity and a $49.00 USB Mic.
In order for a microphone to record into a computer, it needs two things (which are built right into a USB mic):
- An analog-to-digital converter, and
- A preamplifier
Upgrading The Mic
While USB mics are a great bang for the buck and super convenient, most of them do put out a low-level hiss. Of course, with the 6-Tips guide, you’ll know how to get rid of that after the fact.
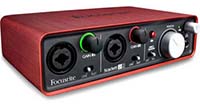
But you can make the jump to a different/better kind of set-up that uses a standard (by which I mean “not USB”) microphone and something called an “interface.”

Standard microphones have a 3-pin connector called XLR. You’ll hear the term “XLR mic” used to describe these mics as well.
A great option for a standard microphone for vocals here is a large-diaphragm condenser (LDC) mic. These are great for voice recording, as well as being a good choice as an all-around mic.
One good entry-level LDC mic is the Audio-Technica AT2020 for about $99.
An interface box (well, sometimes they look like little tubes instead of boxes, but just go with me on this…:)) such as a Focusrite Scarlett, which is what I use, has everything a mic needs to record into a computer – the converter and the preamplifier.
The interface box plugs into the computer with a USB cable. Then you simply plug your standard (not USB) mic into the interface box and you’re ready to record your awesome voice overs.
You’ll also need some software. For voice over recording, you may never need anything more fancy that the incredible Audacity audio recording software. Why is it so amazing. Well, mostly because it’s free :-P. But also because it can do all the basics – very possibly everything you will ever need it to do! That post I mentioned above (Voice Over Recording Using Audacity and a $49.00 USB Mic) has audio recorded with Audacity, as the title suggests.
The last piece of gear you’ll want is headphones. These don’t have to be expensive. But you do want a good way to hear the details of your voice recording to make sure it is as clean and free of noise as possible. You can usually hear little things in headphones that you can’t hear when just listening to your recording through speakers.
You can always upgrade the mic, interface, headphones and software at a later date. But these items I listed are pretty awesome already. If and when you decide to upgrade, you can do that a little at a time as your budget allows.
So now you know. You can set up a voice recording studio pretty much anywhere you can put a computer, microphone and – if you’re not using a USB mic – an interface box. I think a bedroom is as good a place as any:).
Now go out there and get voice over jobs!
Free videos from “The Newbies Guide to Audio Recording Awesomeness”

[…] need a voice recording studio of some kind if you plan to get into doing voice overs. With technology being what it is in 2017, […]
[…] voice over actors need very little in order to produce professional sounding results from their voice recording studio right from […]