Improve The Quality Of The Audio You Record At Home – Tip 6: Acoustic Treatment
We’ve been doing a series of posts over the last 5 weeks – giving you tips on how to improve the quality of the audio you record in your home studio. The first of the series is here: Improve The Quality Of The Audio You Record At Home – Tip 1.
The first 4 tips were all about technique – ways to immediately improve your audio without having to buy or build anything. A huge majority of people recording in home studios using converted bedrooms and don’t use any acoustic treatment in their rooms.
I’ve recorded this way for over 10 years. The problem with doing it this way is that the rooms in our houses have notoriously bad acoustics – making your audio sound reverb-y and echo-y.
So the first 4 tips in this series showed you how to reduce that bad room sound in your recordings immediately, without having to buy or build anything.
Then last week, week 5, we talked about microphones – how no matter what mic you currently use, you can almost certainly improve your audio by upgrading to a different mic without having to spend a lot of money – in fact most can do this for $100 or less.
The (Potentially) Best For Last (If You Have The Budget)
In this week’s tip I will share something that has a bit of a game changer (yeah, sounds dramatic but it’s true). I put acoustic foam on my walls that just about totally eliminates that bad, echo-y room sound! HOWEVER, recording close to the microphone – like 3-5 inches away – can reduce room echo by a LOT even without acoustic treatment.
NOTE: This final tip – though it is super helpful in a home studio – is not strictly necessary to get professional sounding audio. I recorded everything for my voice-over and music careers in this same studio with only tips 1-through-5 for several years. But if you CAN afford to do it, make it happen ASAP.
There are several types of acoustic foam that you can use to treat your room with. Auralex is probably the most popular manufacturer, and they have several packages to choose from. I originally used Acoustic Fields panels. But ATS acoustic panels will do the same job.
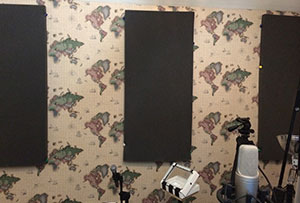
Regardless of the brand you choose, You’ll want to cover up a pretty fair percentage of the walls in your recording room. Look at the picture at the top of the page to get an idea of how much foam I have on my walls. I put foam starting at about my waist level and going up to the top of the wall.
Overall, I’d say about 20 to 25 percent of the walls have foam on them. You can probably get by with less than that if you place them on the wall opposite where you face when you record, and also on the wall behind your normal recording position.
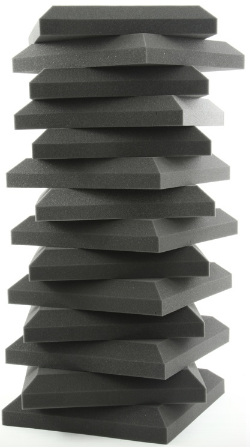
I recommend starting with about one pack of 14 of the Auralex 1-foot square panels. then if you need more, you can add panels until those echoes are tamed.
Once some of this foam is on your walls, it absorbs the bad room reflections without sucking the life out of the sound of your voice, as is the case so often with other room treatments.
Our Tests With The Foam
Before putting any foam up on the walls in my converted bedroom studio, we wanted to do some before and after tests to make sure it would truly make a difference. So my wife (Lisa, fellow voice-over artist and singer) and I did a series of male and female vocal recordings – spoken, shouted and sung – with no foam on the walls.
Anyway – the tests. After recording samples with no acoustic treatment on the walls, we basically covered the walls with foam, leaving no more than a couple of inches between panels. Then we recorded the same samples. We – were – blown away! There wasn’t even a hint of room sound after the foam went up.
Next, we removed every other panel to find out how much treatment was enough. It is possible to overdo it. Well, it sounded great with no hint of room sound at all. Removing every other panel opened up the sound slightly as well —- “letting the audio breathe a little” is probably the best way to put it.
Below is a bit of the before and after audio. The samples were recorded 18 inches from the microphone to maximize the effects. The shouted phrases were also chosen to send a quick loud vocal through the room.
This song for the singing sample was chosen for the same reason, AND the fact that it’s in the public domain. Also, the before and after samples have been normalized to be the same volume to eliminate loudness as a factor. Though the difference is clear listening on your speakers, to hear how truly dramatic the difference is, try listening with headphones;).
Before
Male “Before”
Female “Before”
After – WITH The Foam On The Walls
Male “After”
Female “After”
Close VoiceOver Samples
The above audio was used for putting the foam through a tough test of absorbing the worst reflections the room could generate – recorded 18 inches away from the microphone.
As we know from Tip #1 in this series, recording far away from a microphone in a room with poor acoustics gives you a LOT of room sound. So if we have no treatment on the walls, we need to get very close to the mic. Most people aren’t going to record from 18 inches away, so the above is maybe not your typical use.
So we recorded fairly close to the microphone (about 6 or 7 inches away) using the foam, and the “omnidirectional setting” on the mic (which we couldn’t use pre-foam due to how much extra room sound that pattern picks up) to demonstrate how good the foam allows our voices to sound now.
Male Voiceover With Omni Setting and Foam on Walls
Female Voiceover With Omni Setting and Foam on Walls
More Testing
After we conducted the above tests, we removed all the foam panels and decided to test the foam against another product, which purports to remove poor room acoustics in vocal recording.
It fully encompasses a microphone with acoustic foam – you stick you microphone inside of it. Our goal was to play each sample in headphones, and NOT tell the person listening which sample was being played. In other words, it was a blind test.
We both chose the wall treatment foam as by far the best. In fact, not only did the other product not even eliminate the bad room sound despite completely encompassing the microphone. It actually made our voices sound worse – all muffled and unnatural.
The audio recorded with acoustic foam on the walls, on the other hand, sounded fantastic; no room sound and it actually made our voices sound better than usual.
What was really happening was not that the foam “imparted” anything extra to the recordings, but rather it absorbed the undesirable room echoes and what remained was ONLY what should be there – our natural voices – with nuances and polish like we’d never heard.
Life Changing? Really?
So how did this “change my life?” Well, for one thing it will cut my production time by more than half of what it was. Without the foam, in order to reduce the amount of room sound in your recording, you have to get very close to the microphone (that was tip #1 in our series).
But that results in a lot of p-pops, which have to be edited out (that was tip #5) after the fact. At least half of my vocal recording production time was devoted to editing out the p-pops! But now I don’t have to get close to the mic, so there are no p-pops.
Just that alone would have been awesome. But more than that, our voices sound better than ever. And we don’t have to fight our room anymore. We don’t have to set up bulky baffles or stuff the mic into anything. We don’t have to go into the closet. We get to use the room!
Also, I can now use the omnidirectional and figure-8 settings on my microphone, which is pretty much impossible in a bad-sounding room because those settings make room sound even worse.
This means we can record small vocal groups (try fitting THEM into a closet!), podcasts with multiple people using a single mic, and a lot of other things that were simply impossible in a bad-sounding room if you wanted the audio to sound professional.
So the final tip in the series is try acoustic foam on your walls to basically turn your whole room into a vocal booth. It will basically make it unnecessary to employ any of the usual counter-measures to fight the room sound in home studios, making it easier and faster to produce great-sounding voice recordings. Here is my current recommendation – ATS Acoustic Absorbing Panels (with Amazon link).
Here is how to get started
Like I said, there are several brands of acoustic absorption foam. But one of the most popular and easily available is Auralex. Below (on the left) is a package of their 1-foot square panels to get you started:
Yes, there is a cost involved here – an investment really. Consider this. Even the most expensive microphones will sound bad if used in a room with bad acoustics without applying tips 1-5.
Two very popular vocal mics are the Neumann TLM-103 and the Sennheiser MKH 416 shotgun mic. These cost $1,100 and $1,000 respectively. If you are serious about a career in voice overs, I recommend treating your room BEFORE you purchase that expensive microphone. You might find that a much less expensive microphone is all you need, once your room is not adding echo-y, reverb-y ickiness to your voice.
Join Us For More Home Recording Awesomeness

At Home Brew Audio, I am trying to bring professional audio recording into reach for regular, non-engineer and “techy” folks. To get you started producing professional sounding audio from your house, see the picture below to get access to the first 6 lessons in our tutorial course “The Newbies Guide To Audio Recording Awesomeness.” In this course, you will learn how to set up and start using your home recording studio for a budget of about five bucks (or less) in about 30 minutes.
Hi Ken,
Thanks for the video! I really enjoy your tips!
Looking forward to more of those.
Eugene
Thanks Eugene! Next week there will be a webinar (Google Hangout) with the inventor of this awesome foam – Dennis Foley. If you are on the mailing list, you’ll get a link for it. It will be at 1:00 pm EST (10:00 am Pacific) May 21st.
Cheers!
Ken
Ken,
I have been quite enjoying this video series. Will you be making the audio of your webinar available for those of us who will be unable to attend?
DTW
Thanks Dan,
Yes. Actually the audio AND video will be available on YouTube afterward, since this is a “Google Hangout On Air.” I’ll send the information out afterward, but it should show up on the HBA YouTube channel as a video.
Hey Ken – great demo. I do a lot of screencast recording and always wondered if having my microphone between me and a 29″ screen was producing a lot of reflection. I use the cardioid setting on my mic to reduce it as much as possible. Do you find that room noise contributes more to the echo than the reflection you get from your monitor? In other words would this foam on my walls show as drastic of an improvement even with a monitor in front of me?
Thanks,
Mike
Hey Mike! I still think it would. But it is obviously not possible to know definitively. Dennis says that glass is horrible for reflections. But I’ve never felt like my monitors were contributing much to my room sound. It was definitely the walls. Most likely for me, the smaller (more standard sized) screen size represents such a fraction of the surface area of the walls, that it was negligible. You’d want to test it out first. Acoustic Fields offers a 30-day money-back guarantee. So if you wanted to check it out, you could do that and if your screen proved too much, take advantage of the guarantee.
I hope that helps! I just added that to the list of questions to ask Dennis on the call Wednesday.
Cheers!
Ken
hello ken,
when do you have coupon codes and/or sales on your videos? my bday just passed this week but i still don’t have enough for the newbies guide and i’ve been waiting for months!
thanks!
t
T – How about now?:-P. I’ll put a Spring coupon on all the courses for 50% off. Does that help? Below are the coupon links. Just click on those, and the coupon will be automatically applied (note: on the page for Newbies Guide 1, you’ll see the normal price, but the sale price ($18.50) will be applied at the PayPal order screen).
https://www.homebrewaudio.com/NewbiesGuideStreamingRap/?dc=SPRING15
https://www.homebrewaudio.com/NewbiesGuide2/?dc=SPRING15
https://www.homebrewaudio.com/NewbiesGuide1and2/?dc=SPRING15
Let me know if you have any problems!
Cheers!
Ken
Hi Ken, I really enjoyed the whole series of videos. Especially since you’ve focused on how to use the best the tools we already have !
I do not have anything close to your experience, but just to share one personal tip I found effective when recording video+voice for online courses in my 3mx3m multi-purpose bedroom-converted room : by taking care of *not* placing my desk parallel to the wall, I significantly reduced the primary reflection when recording with an omni lavalier mic.
In addition, and this is probably your case from what I can see on the videos, having shelves filled of various items on 2 or 3 wall probably helps a lot with diffusion.
Thanks Sylvain!
You’re correct about using the corners. But in the case of listening (like a musician would need to do in order to properly mix tracks), it’s best to balance where the speakers are in the room and try to treat the walls, use diffusers and then critically listen on other systems in other places – outside is best, actually, just not practical:). But for recording vocals, yes. You are correct. Some folks have mentioned standing in a corner with their backs to it, facing the opposite corner of the room when recording voice. This can be more effective with a mattress behind you as you do this.
Thanks again!
Ken