Quickly Improve The Audio Quality Of The Blue Yeti
If you use a Blue Yeti USB microphone for recording your voice, here are several things you can do to quickly and easily improve the audio quality of your recordings.
Probably the most important cause of poor audio quality in home vocal recordings is room echo. The box-shaped rooms in most houses that we use for home offices and recording spaces are very good at making lots of echo-y reverb-y “room sound.” That’s because our voices bounce off the hard walls and then continue bouncing back and forth and all around.
Even the most expensive microphones will make your vocal recordings sound less than professional with too much echo from bad acoustic spaces. And that is not a good thing for your podcasts, audio books, voiceovers and video narrations.
The ideal solution is to acoustically treat the room. This usually involves placing foam panels on all the walls to stop the sound bouncing around. But that can be expensive and time-consuming. But you can make a huge improvement in audio quality in just minutes with a few simple tweaks in how you use the microphone.
Things That Make The Audio Better…And Worse
Let’s assume you’re not ready for a big acoustic treatment project yet. So it’s just you, the microphone and the room. Depending on how you use the mic, you can make things better or worse.
1. The farther you are from the microphone, the more room echo there will be in the recording.
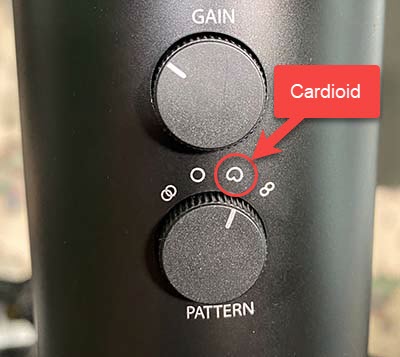
2. If you have a choice of pickup patterns (omnidirectional, bidirectional, or cardioid), anything but cardioid will result in more room echo. The directional cardioid pattern will only pickup audio from right in front of it, and reject audio (including echos) from the back and sides. So unless you have a very good reason for using a different pattern, turn that knob to “Cardioid.”

3. Speaking into the wrong side of a mic can increase the echo and make you voice sound “thin” and odd. Since many vocal microphones are symmetrical, it can be confusing. Which side do you speak into? See my video, “A VERY Common Voice Recording Mistake – Are You Using The Wrong Side Of The Mic?” about this.
- The Blue Yeti is even MORE confusing on this issue. The top part of the mic is round. So not only is there a question of “which side” to use. But there is also the common idea that you speak into the end (top) of it, as you would with a handheld stage microphone. That is incorrect! The Yeti is a side-address microphone. The correct “side” (yes, this circle has a “side.” Don’t think too much about that :-P) to speak into is the side with the “Blue” logo in a circle.


4. If your input level (gain) is too high, your audio will be too loud. When this happens, distorting/clipping will ruin your audio. Most USB microphones make this difficult. You have to change the input level in the OS settings. HOWEVER, the Yeti has a “Gain” knob on the back. While this makes it convenient to control the input level, it also MAKES IT CONVENIENT TO TURN IT TOO HIGH. I have heard many distorted voices on conference calls because the knob was turned up too loud. To be sure, make a test recording on your computer with recording software, and look at the waveforms to make sure they aren’t going outside the top and bottom lines of the audio track.
Here is an audio sample of audio distorted on the Blue Yeti because the knob was turned up too high.
How To Get The Best Audio Quality
OK, so now that you know ways you can make the audio sound bad, here is a list of things to do to make it sound much better.
Get Your Mouth Close To The Mic
Most people are too far from the microphone because the Yeti comes mounted on a nice looking, heavy-duty desk stand. For many folks, that puts the mic a foot or more away from your mouth as it sits on the desk in front of you. You would have to hunch over and lean forward to get to the distance I recommend, which is 3-4 inches from the mic.
So if you can’t easily get your mouth close to the mic sitting on your desk, I HIGHLY recommend getting a microphone stand – the boom type that allows you to put the stand at any angle. Then remove the Yeti from its desk stand by just loosening the screws on either side by turning their knobs. There is a female mic stand connector on the bottom of the Yeti that will allow you to connect it to any standard mic stand. That will allow you to position the mic close to your moth without having to bend or lean your body over.
In addition to the mic stand, I also recommend connecting the Yeti to a shock mount. This is a ring that holds the mic suspended by rubber bands, which isolates the mic and prevents bumps and vibrations from the mic stand (not to mention mouse and keyboard clicks) from getting into the mic. The Yeti doesn’t fit into just any old shock mount. So I recommend the Blue Radius III, which is designed specifically for the Yeti (Amazon link).
Use The Cardioid Pattern
As I mentioned earlier in the article, the cardioid pattern limits where audio can get into the mic, which means it limits room echo also. Just turn the knob on the back of the mic to point at the icon that looks like a heart.
Another benefit of using the cardioid pattern is that your voice will sound deeper as your mouth gets closer to the mic. This is due to something called the “proximity effect.” However, there is one thing that gets worse when your mouth is close to the mic in cardioid mode. P-pops will get more pronounced. That is the deep, low-frequency splat or “pop” that happens when you say “plosive” sounds with your mouth, such as P and B sounds. It’s not a bad tradeoff though. P-pops can be limited by putting a pop filter (pop screen) between your mouth and the mic. And even if some p-pops do get recorded, they can be easily edited out. See my post about that here: How to Fix a “P-Pop” in Your Audio With A Sound Editor.
Speak Into The Correct Side Of The Mic
As I mentioned above, the Yeti is a side-address microphone. You do not speak into the end (top) of it. And the image earlier in the article shows you which is the correct “side” to speak into.
Don’t Turn The “Gain” Knob Too High
When you get closer to the mic, you’ll have to turn down the input level to prevent the sound from distorting. I found that having the line on the knob (on the BACK of the Yeti) pointing to about the 10 o’clock position is about right. But this may be different for everyone. So you’ll need to do a few experiments with some recording software to make sure your audio wave forms are large (loud) enough without being too loud and extending beyond the top or bottom of the audio track.
BTW, the knob on the FRONT of the mic that says “Volume” is just for the headphone volume. It has no effect on the input level.
Here Are Some “Before” and “After Audio Samples
I made some recordings to demonstrate what I’ve been talking about. The first audio is the “before” picture. It is fairly common for people recording with Yeti microphones to produce audio that sounds like this.
First, I recorded in the place with the most room echo in any house – the bathroom. I did this to demonstrate how much improvement you can get EVEN in the worst possible room. Most people won’t (I assume) be recording in bathrooms. So their audio should sound much better than the “after” audio below. Anyway, I set the Yeti on a desk, connected to its desk stand. And recorded from between 12 and 18 inches away. Here is a sample of that audio.
Then I made all the tweaks I mentioned above. You can do all these things in the next few minutes! Don’t worry about the shock mount for now. Just getting the Yeti on a mic stand and off the desk will make a huge difference. Then I selected the cardioid pattern, attached a pop filter, and turned the Gain knob down to about the 10 o’clock position.

Below is what the “after” audio sounds like. This is much more professional sounding. And there was no need to buy a new mic or set up any acoustic treatment. I would like to point out that there is STILL more room echo in this audio that I’d normally like. And that is because I was recording in a bathroom :-P. In a standard converted bedroom, there would be much less echo.
Summary
So though it took awhile to write, it took me less than 5 minutes to remove the Yeti from its desk stand, put it onto a mic stand switch to cardioid pattern, and adjust the input level with the Gain knob. Just those few steps can move the quality of your recordings from the “amateur” category to much more professional. You can likely make things even better, eventually, by adding acoustic treatment to your room and maybe even purchasing a vocal booth to keep out external noise like air conditioners, leaf blowers, vacuum cleaners, birds, dogs, TVs, etc. But the steps here are much faster, cheaper and will make a huge difference right now.
If you’d like to get your own Blue Yeti USB mic, click here (Amazon) to find out more and/or order one.
I have been using my BluevYeti for two years now with. No problems. Now I am starting to have issues . The problem is that when J sing into the Yeti and use a second computer connected to a Bose speaker that is playing an instrumental track, the Yeti will not allow both my voice and instrumental track to work together as one output. . Either the recording comes out all my voice or just bits and pieces of the instrumental track. I am not doing anything different than before . Mike placement is the same, my distance from the microphone is the same the distance of the Bose speaker (coming from the second compuer) to the Yeti is the same. After this set working flawlessly f or two years, now this strange problem is happening. Any suggestions what I should try? Thanks Greg , Minneapolis
That sounds to me like something broke. If you’ve been using the exact same process for years and suddenly, that exact process doesn’t give you the same result, I’d bet that something broke down somewhere, and probably in the mic. The only other possibility I can think of is that maybe the pattern on the yeti changed? Is it possible that maybe it got changed to omnidirectional or bidirectional?
Also, I’m wondering if you can put the instrumental music onto the same computer you are recording into. You could open whatever program you are using to record – say Audacity, and put the instrumental file on track one. Then while that is playing back through headphones (so the mic doesn’t pick it up), you sing into the Yeti on track 2. That is the standard way to mix an instrument and a vocal. And it would give you the ability to adjust the relative volume of the music and the voice separately.
Hi! Thank you for this information! I’ve tried all the corrections and I’m still getting an echo (or loop?). My cohost and I spent two hours trying to record our podcast only to give up, frustrated. Second problem: I got her a Yeti microphone, so we would sound the same, but she had some viewers complaining about a crackling sound and she ditched it.
Any suggestions?
It sounds to me lees like room reverb and more like you are getting some kind of bleed or doubling of a signal somewhere. You mentioned a cohost. Are you in the same room?
So helpful. If wer’re ready to upgrade to the shock mount do you have a recommendation?!
I have and recommend the Blue Radius III.
Does the placement of the microphone make a difference as well? I do my recordings in a small carpeted room but due to the shape of the room plus the size of my setup, the majority of the rooms open space is behind me (think of a cone I guess since my desk is in a corner.) I’ve tried to get rid of the echoey reverb sound but to no avail which is strange because the room itself doesn’t have much of an echo unless I yell of course. Could the mic be capturing the reverb because I have so much open space behind me?
For context, my yeti came with a shock mount and I even bought a condenser in hopes that that would work. Lastly, I’ve noticed that if I do so much as turn my head, I literally sound like I’ve gotten up and walked away. Is that normal? I know you mentioned being close to the mic but I tend to move my head a bit when I talk haha. Thanks for the explanation!
As far as placement, you should be talking into the side of the mic with the “Cardioid” pattern selected. And you need to make sure you are talking into the correct side of the mic. What you are describing sounds like you might be talking into the wrong side. Or possibly have the omni or figure-8 setting selected. Make sure of those things.
Also, what did you mean when you said you “even bought a condenser”?