How To Make A Podcast Sound Professional
There are many ways to make a podcast sound professional. And we’ll look at a bunch. But let’s talk today about the fastest, cheapest and easiest method. And you can do it right now. Of course this will apply to any vocal recording, such as singing, voiceover, audio book narrations and video narrations.
The Big Tip
Are you ready for this earth-shattering, highly technical method for making a HUGE difference in your audio quality? OK. Here goes. Get your mouth close to the mic.
End of post.
Well, OK. there are more things to say. But really, I could have left it right there and still provided the number one tip for making your audio sound professional.
How Close?
That’s a great question. I’m so glad you asked. My advice is to get your mouth 3-4 inches from the microphone. If that is not possible, try to at least get inside 6 inches.
There are a few reasons why this makes such a big difference. But let’s start with a quick video to demonstrate the difference this can make in audio quality.

I referenced this being “tip #1” in that video because I did a series of tips a few years ago. If you’re interested in that next tip, you can find that here.
So Why Does This Work?
There are several reasons why this works, which you may or may not care about. But primarily, it allows your voice to be front-and-center. And it sort “crowds out” the room echo/reverb that is so common to audio recordings made in a home office/studio.
Also, it allows the mic to pick up more detail in your voice – the richness and subtlety, the fullness. And if you can capture THAT, it almost doesn’t matter if there is some noise and room reverb mixed in there. That’s because those things can be reduced or removed when editing (different posts for those things :-)). but you can never ADD those special and unique things about your voice back in after the fact if the mic didn’t capture them.
And one other feature of most mics (ones with the “cardioid” pickup pattern) is something called the proximity effect. That means your voice will sound deeper the closer you get. This can often have a pleasing effect and make you sound like a radio announcer or movie trailer voice. there is one drawback to this, which is that your voice will produce more “plosives” (also called p-pops), which is that sort of low frequency pop caused by a sudden blast of air into a mic. But as with noise and reverb, these can be removed during the editing process.
Do NOT Back Away From The Microphone
Sometimes, you’ll notice that you are recording at too high a level. This causes distortion because it means you are overloading the input hardware. Your voice is too loud. So how do you fix that? Well, first let me tell you how NOT to fix it. Do NOT “back away from the microphone!” It feels so logical. And I’ve heard directors and producers say it to podcasters a lot. You’re too loud. Back off the mic. But for the reasons I mentioned above, this is the absolute wrong thing to do (unless you are in a room that is acoustically treated – again, a topic for a different post).
So What DO You Do?
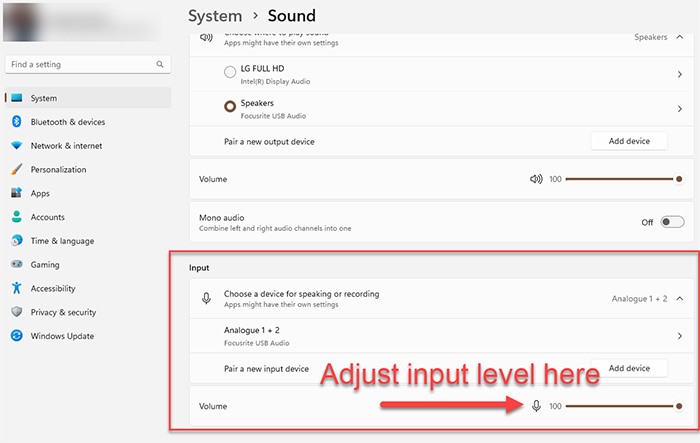
Adjust the input level control. That control will be different, depending on what kind of mic setup you have.
If you are using a USB microphone, you need to use Windows Sound. You can adjust the properties of the input level with a slider. On a Mac, you’d use System Preferences>Sound and adjust the slider on the Input tab.
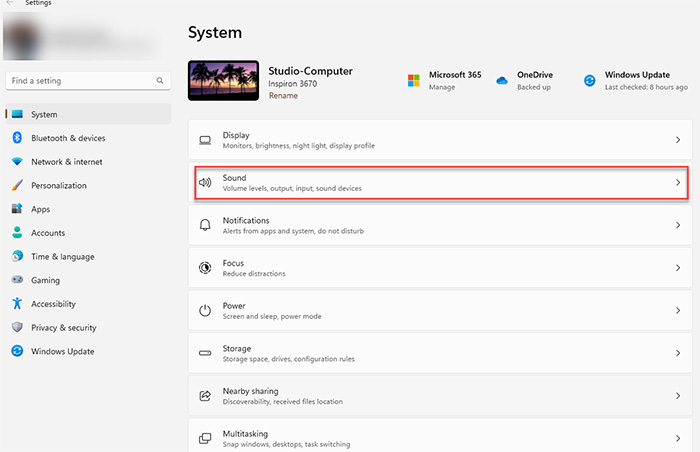
In Windows 11, you can use the System>Sound Panel. See the pic below. You can get there by going to the right and click on the speaker icon on the right side of the taskbar. Then the gear icon, which goes to the Settings screen. And from there you click “Sound.”
You can also get there by right-clicking on the speaker icon and selecting Sound Settings, which takes you straight to System>Sound.
In Windows 10 AND 11 you can use the method I show in this video, which goes to the “Manage Audio Devices” panel.
Some USB mics, like the Blue Yeti, have a gain knob right on the mic, itself. but sometimes even with that turned all the way down, you still need the Windows (or Mac) Sound adjustment.
If you use an audio recording interface, there will be a “gain” knob on the front on the box. So all you need to do is turn that down.
So do all of the above, but do NOT back away from the mic to control input levels.
That took a lot more time and digital ink to describe that it does to do. This is such a fast and easy thing to do with such an immediate effect, that I really want to tell every content creator in the world about it.