3 Keys To Killer Drum Tracks When You Don’t Have Any Drums
Many musicians are acting as their own recording engineers, using computer-based home recording studios whose capabilities are ever-improving while their prices are ever-decreasing.
These home recording studios are, more often than not, located in a spare bedroom. Trying to record an entire band along with drums can be challenging with a studio like this, assuming you HAVE a band and/or drummer.
But what about the many home studio recording musicians who are running solo? What if you want to record a song with drums but you don’t have drums OR a drummer. Are you out of luck?
Why, of course not. Virtual instruments, in this case virtual drums to the rescue again. Drum samples (actual recorded audio of drum hits) are widely available. But there are several tricks to building a drum track that sounds realistic, even with real drum samples. I’m going to share 3 of those vital tricks with you.
Build Your Own Drum Parts
There are virtual drumming programs out there that will automatically play the drums for you, sort of like the drum machines of old.
But we’re not going to talk about those today. We’re going to build our own drum track so that we have ultimate control and flexibility, and get exactly the drum grooves and parts that we want. Plus this will give you the skill to add any type of percussion to a song very quickly at any time.
For this example, I’m assuming we’re using a drum kit sample in a recording program that has MIDI functionality (for a review of what MIDI is, see our post MIDI Recording – What Is It And Why Is It Awesome?). Reaper springs to mind, but there are many other audio programs where MIDI is actually more of a primary function.
Either way, the first thing we will need to do is load up a drum kit on one of our tracks. Start a new track and attach the virtual drums via whatever method your software uses.
In Reaper, click the track’s “FX” button, which will give you a menu of plug-ins to choose from, including virtual instruments. Pick you drum program and then select your kit.
Again, there are many virtual and MIDI drum plug-ins and programs out there. For this example I use StormDrum, by EastWest. Tell the track to use your MIDI keyboard as its input and you’ll have each drum in the kit mapped to a specific key on your keyboard.

The next thing you need to do is make sure you establish a tempo for your song in the software and turn on the click track. This is important for keeping everything aligned.
Next, go ahead and record 5-10 seconds of yourself playing some of the drums with your fingers on the keyboard. This will put a MIDI item in your track (as opposed to an audio item).
Now double-click the MIDI item, and the MIDI editor window will open, which looks something like Figure 1. You can now add and drag notes around on the grid until you have a few measures of the beat you want.
If you need more MIDI item space to work with, no problem. Just close the MIDI editor window, grab the right edge of the MIDI item with your mouse, and drag it to the right, extending its length as you go.
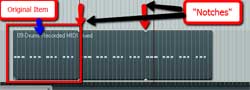
You’ll notice that you can drag it as far as you want to the right, but little notches will repeatedly show up on the item. This is the original MIDI item repeating over and over again, the notches representing the end points, which continually loop as long as you stretch out the MIDI item. See Figure 2, where I stretched the item from about 8 seconds to 24 seconds.
Time For Some Glue and Make it Snappy
To avoid having anything sound off-beat, I recommend the use of two tools, Glue Items and Snap To.
At this point in our example you have a longer bit of MIDI. The problem is that you can still only edit the original 8 second item in the MIDI editor, which will also effect every loop.
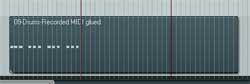
Now it is time to employ probably my favorite of any tool in any recording software, Reaper’s Glue Items tool. Select the longer item (with the notches representing the loop end-points), right mouse-click and choose Glue Items, the notches will go away and you’ll have a non-looped, much longer MIDI item.
Now if you go into the MIDI editor, you can delete what was the looped versions and you’ll have lots more MIDI space to add new drum parts. See Figure 3.
Now continue drawing in drum parts, high-hat, snare, kick, etc. in the MIDI editor, until your get a complete part, which may represent different sections of the song.
Most songs are made up of drum “phrases” that may or may not repeat throughout the song, like Intro, Verse, Pre-Chorus, Chorus, Bridge, Ending for example. Each of these can be built up its own MIDI item, and then put into the drum track in sequence to create the entire song.
For any item that repeats lots of times, such as verse parts, you’ll need to make the item loop-able, so that you can simply drag it along the track to automatically create as many loops/repeats of the phrase as you have verses for that section of the song.
We did the dragging part earlier just to create some blank MIDI space, but now that the drum part is complete, we actually want to keep the looped parts so we can make one part repeat many times with a drag of the mouse. The big difference this time is that you MUST define the proper beginning and ending points before looping.
So the first thing to do is make sure that snapping is turned on and that the grid on your screen represents beats and bars. Now drag the left side of the MIDI item until the start point is right on the measure where the part starts.
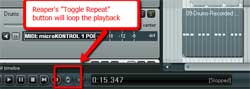
Then do the same thing to the end of the phrase. Now you’ll need to check to see if it’s correct. Highlight the song from the beginning of the item to the end of it. Then tell Reaper to loop the playback of that section. See Figure 4.
This usually takes a bit of trial-and-error. If it doesn’t sound correct the first time, simply drag the beginning or ending (usually the ending, in my experience) a bit to the left or right and try again until you get it right. Remember, it is vital that you have snapping turned on here so that the end-points will always be on a logical beat or beat division.
Once you get it right, it’s Glue to the rescue again! Select the item, right-mouse-click and select Glue Items again. This will create a loop-able phrase of drums that you can drag, stretch, and/or paste to create as many instances of it as you need throughout the song. Do this for each section of the song and you have yourself a completed drum track.
Easy On the Perfection
During the first parts of this process I insisted you ensure the drum parts are right on the beat, and the loops are musically correct, using such tools as Glue Items and Snapping. But sometimes too much of a good thing is, well, not a good thing.
Sampled drums are played by a computer, so virtual drumming can actually be a little too perfect. If you don’t tell the machine otherwise, it will play every drum hit at the exact same volume with the exact same energy, on the mathematically perfect rhythmic beat.
The problem there is mainly that we’re used to hearing drums played by humans (not counting the 80s), who are incapable of such precision and perfection. So the machine-played drums will sound machine-y, too mechanical for good music.
So we need to tell our computers to humanize the performance. What this means is that the drum hits will be randomly shifted in both volume and time just a teeny bit to make them sound more like a human played them.
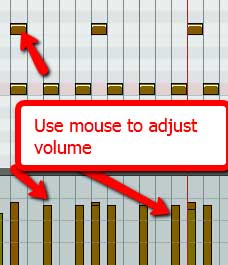
The volume and energy of drum strikes also need to vary in a specific way. For example, a drummer can make a snare drum sound like 3 or 4 different instruments just by how hard she hits the drum.
Heck, Irish bodhrans can deliver dozens of different sounds. Certain rhythms rely on having emphasized and non-emphasized hits. So when you build your drum track, keep that in mind. You’ll frequently have to adjust these settings manually, which can be done in multiple ways in most midi programs. See Figure 5.
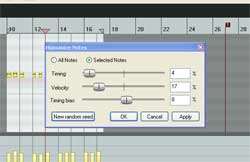
For subtle timing and velocity (another way of saying how hard a sample is struck) differences, you will want to do one or both of the following: make sure your MIDI keyboard’s touch sensitivity (where the sound is louder the harder you press) is turned on (if it has this capability). Then once the MIDI notes are recorded, use the Humanize function in the MIDI editor. See Figure 6.
Believe it or not there are lots of times, in certain genres of music, when a drum beat that is ever-so-slightly behind the beat can make it sound better to us musically. So it’s important for us to keep a little slack in the drum grid.
Killer Drums and No Drummer
So there you have it. It may take a little time, but if you want very realistic-sounding drum tracks without having any actual drums around, use virtual drums and employ 3 important keys:
- Build the drum parts yourself for maximum control and flexibility.
- Use the Glue Items and Snap To tools in Reaper to make it fast and easy to create musically correct rhythms and not have anything sound off-beat.
- Use the MIDI editor and tools such as the Humanize function to ensure the drums don’t sound too perfect, which would not sound natural to us in most musical genres.
Do this just a few times and you’ll be amazed at how quickly you can build up awesome sounding, killer drum tracks without having to have any actual drums. How cool is that?
Our latest home recording course (video tutorials) – The Newbies Guide To Audio Recording Awesomeness 2: Pro Recording With Reaper – has a 3-part lesson showing you how to use MIDI and virtual instruments, including drums. You even get some free drum hits to use with Reaper’s ReaDrums.
Hm… that’s a long way from killer drums 🙂