Pro Audio For Your Video – Review of the BeachTek DXA Camcorder Adapter
The BeachTek DXA camcorder adapter solves a slew of problems for camcorder owners wanting to get decent audio on their videos. It makes it easy to attach professional microphones and other audio sources to your camcorder.
Getting good sounding audio on a video camera, especially a camcorder, is very difficult. First, you either need to get a camcorder that has an external microphone input. That in itself is surprisingly difficult. But even if your camera does have an external mic input, it is almost certain to be a teensy weensy little 1/8th inch stereo “mini” plug. And if you have a standard microphone you want to hook to your camera, it will have a fairly large 3-pin cable, called an XLR cable.
In order to hook an XLR mic to a camcorder (remember XLR is the standard microphone connector), you need some kind of adapter. In most cases you’ll need two adapters, one to turn the XLR into a 1/4-inch plug, and a second one to turn the 1/4-inch plug into a 1/8-inch plug. At that point you can plug the mic into your camcorder, but it is very dicey because you have a heavy cable plug made even heavier with two adapters, hanging off of a small and fragile 1/8-inch pin.
To make matters even more difficult, your camcorder’s stereo mic plug will record all your audio onto only the left channel, so when it plays back it will sound lopsided, like it is coming only from the left side (unless you record with a stereo microphone, which few folks not in the “biz” will be doing). This requires you to edit the audio on your computer to make sure it gets distributed to both left and right channels. What a huge pain!
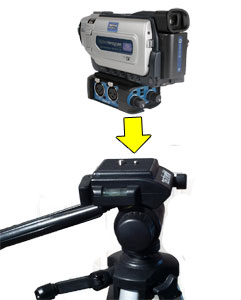
But with this cool product, you mount your camcorder on top of the BeachTek DXA-2T adapter via the tripod connector mounting screw. You’ll need a coin (or a guitar pic, which is what I used) to tighten it from the bottom of the DXA, where there is also the female tripod connector allowing you to mount the whole thing to a tripod.
How It Works
Let’s say you’re doing a talking-head type of video. Without an external mic connector on your camera, your sorta forced to use the built-in camera mic, which is small and of pretty poor quality. But the biggest problem is that the mic will be too far from the mouth of the person talking. This will cause the audio to be echo-y and noisy.
If you do have an external mic hook-up, you can now set up a decent microphone (a dynamic mic like the Shure SM58 or Electro-Voice RE16; or a large diaphragm condenser mic like the Audio-Technica AT 2035 or the Rode NT2-A) in front of the person’s mouth to get good quality audio. Just attach the BeachTek to your camera and you’re ready to plug the microphone straight in with no adapters, and record awesome audio along with your video.
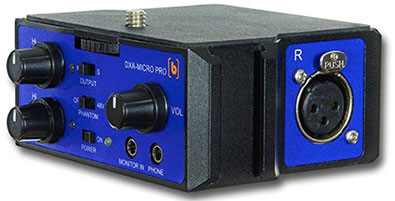
The BeachTek has two XLR inputs, each with a switch to select Mic or Line input. You’d use the line input for an instrument or a mixer feed, for example. In addition to the two XLR inputs there is Aux (auxiliary) mini-plug input that is ideal for wireless receivers.
Each XLR input also has Trim control knobs which allow you to control the input levels, essentially turning the DXA into a little mixer if you’re using two mics. Oh yeah, I didn’t mention that having the two XLR inputs allows you to use two mics simultaneously. You can either mic two different people or use 2 mics for stereo recording. There’s a switch on the DXA that allows you to choose mono or stereo.
How is It Powered?
Another of the features of this little box is that it requires no batteries or other power of any kind. This simplifies things and helps keep the unit light-weight. It does bring up a bit of an issue, though, for using condenser microphones, which I always recommend doing if you are recording inside.
But condenser microphones (see our article: What Are The Different Types of Microphones? for a review of this) require power in order to work. So how do you use a condenser mic with the BeachTek? If you are using a shotgun mic, these frequently can operate on batteries.
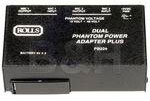
One good example is the Audio-Technica AT8015. Several other condenser microphones use batteries as well. I used a Shure Beta Green 5 (unfortunately discontinued) for one of the video demos below. Another battery powered handheld mic is the Rode M3. If none of yours can work with batteries, you can either run it through a portable phantom power box like a Rolls PB224, which operates from 9v batteries, or you can simply take the output of your recording interface or mixer and run that into the DXA.
Results
Here are 4 videos. The first one used no external microphone at all.
The second video used a battery-powered handheld condenser mic plugged into the BeachTek DXA.
The third video used a Shure SM58 dynamic mic (no power required).
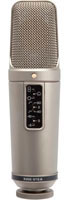
The forth video used a large diaphragm condenser, the Rode NT2-A.

Setting everything up was easy and fast. It took me exactly 2 minutes to attach the device to my camera and then the whole enchilada to the tripod. I had read the instructions (taking a major hit on my man-card to do so:)), which are short but important. Then I recorded four short videos. The fact that I can hook my primary studio mic, the Rode, to my camera is just awesome!
To sum up, I’d say the BeachTek DXA-2T is a must-have device for folks with camcorders who have been wanting to hook up their “good” mics to their camera. It is also excellent if you want to connect two mics or take the output of a mixer if you’re recording a live performance or concert. If you already have a decent wireless lavalier or a shotgun mic, which have mini-plug connectors, the DXA may not be as immediately useful, though it still gives you more options if you ever need them. The DXA goes for $179.00.
hi Ken really appreciated the different videos showing you the sound quality across the different types of mics it really gives you a feel for what type of sound you want to have if you do us a external mic.
thanks
Sunny
Thanks Sunny! Yeah, you can tell folks all day that “the sound quality is better,” but it REALLY comes across when you can actually hear it.
I got two grace design single channel preamps, a model 101, and a m101 to go with my Beachtek. One for each channel. The Beachtek will be here Sunday, I will let you know how it goes. The plan is to connect the xlr output of the preamps one to each xlr mic input of the Beachtek, and run the output from the Beachtek into my Canon Vixia hfr800. Preliminary testing done today shows that contrary to my expectation, when I turn down the preamp volume on the camcorder to 1, and use a Shure attenuator to reduce the line level signal from the model 101 to mic level to connect to the Canon, the input is too weak,, and requires too much gain. I also tried using a Sesscom trs attenuation cable, same result. So I connected the output from the model 101 directly to the camcorder, turned the volume on the camcorder mic control up to 10, and tested three different mics. A Rode NT1, Sennhieser e835, and a MXL R144HE. Each one worked fine with the proper gain and voltage. The difference is, the connection to the camcorder was out of phase since it was xlr-stereo. I expect the preamp output to double with the use of the Beachtek, since it puts the xlr input from the preamp in phase for use as a stereo signal (with two preamps). I fully expect to be able to reduce the mic volume on the camcorder as well as the gain on the model 101 preamp. I will keep everyone posted on the outcome. This setup will greatly reduce any noise from components in the chain, especially the camcorder preamp, and the ribbon mic (MXL R144HE). The setup I am using is already the quietest ever for me. Now I have four attenuators (two xlr Shure, two trs 1/8 Sesscom) I probably do not need.
Wow, Reginald. Thanks for that information! You have two m101s? I’m jealous:-P. I look forward to your results.
Cheers,
Ken