How To Be a Famous Singer

If you are asking how to be a famous singer, you will probably get a dozen different answers from a dozen different people. But one thing you can be absolutely sure of is that you will need a recording of yourself singing. This article will show how you can do that.
One episode of the TV show, Glee (the Saturday Night Fever one) posed some fantastic questions that hit a little too close to home (yes, I was in “vocal band” in high school, which is what passed for the kind of glee club or show choir they have on Glee).
I so wish I could send this article to my high school self. Anyway, the teacher, Will Schuester, was worried about some very talented seniors in the glee club – NOT because they weren’t talented, but because though they wanted to be famous, they didn’t know how.
Santana, was totally sure that she would become famous. She just couldn’t tell anyone how or for what. Mercedes knew for sure she wanted to be a famous singer, but she didn’t know what to do to make it happen.
So many kids have the dream of being famous singers. They just don’t have a plan. Since there are so many paths to this goal, I’m not going to espouse any particular one. But no matter what path you decide to take, you’re going to need a demo recording at the very least, and a preferably an entire album that people can buy.
How To Record Your Own Album or Demo
In the past there was really only one way to record your singing, and that was to go to a recording studio. It was expensive then and is expensive still, typically around $40-$50 per hour. It takes a long time to record just one song, so the cost gets really high, really fast, especially for a full album.
Until very recently the only way to get truly professional quality recording done was via the above commercial studio route. In fact, there are people who still believe that. They are wrong. Here is what you will need to record professional audio from home.
- A computer – In 2020, just about any computer will be all you need.
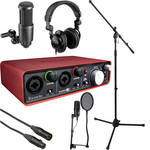
- An audio interface – This is a small box that plugs into your computer (usually) via USB. You’ll plug your microphone into this. Get the Focusrite Scarlett 2i2, which has two mic inputs ($150).
- A microphone – There are lots of types. You’ll want a studio condenser type of mic such as the Audio-Technica AT2020 ($82).
- Recording software – There are lots programs. Get one called Reaper, which is awesome and only $60. Download it now.
- A few extras – Get a mic stand, a mic cable, a pop screen, and a pair of headphones.
The above represents what I consider to be a starter studio capable of producing pro audio at the lowest cost. Everything above will run about $300, which would be about the same amount it would cost to record 2, maybe 3 songs at a studio. I worked with B&H Photo-Video-Audio to create a home recording starter bundle – pictured on the right above – for only $260. CLICK HERE for more info or to purchase that.
So many kids have the dream of being famous singers. They just don’t have a plan. Since there are so many paths to this goal, I’m not going to espouse any particular one. But no matter what path you decide to take, you’re going to need a demo recording at the very least, and a preferably an entire album that people can buy.
Recording Your Songs
There are too many variations in music styles to go over every possibility, so I’ll describe how to do it with an acoustic guitar and singer, a very basic and simple example.
Open Reaper software and create one track. See this video on how to do that (plus a few other things to get started with Reaper) – Reaper Tutorial Video.
Record the guitar part (if you don’t play guitar, obviously you’ll need to ask a friend who does to come over) using the same method from the video. Just face the mic about 6-10 inches from the part on the guitar where the neck meets the fret board or around the 12th fret.
Once the guitar part is recorded, disarm the record button (just press/click it until the red light goes off) on the guitar track, and open a second track so you can record your voice. Again, the video shows how to do this (open a second track).
This time make sure any speakers are turned off. Otherwise the guitar playback will get picked up by the mic when you are singing. Of course, you’ll need to hear that guitar track somehow in order to sing along, right? That is what the headphones are for. Plug those into your interface box (the Scarlett or whatever kind you have) and put them on your noggin.
Now arm track 2 for recording (make doubly sure track one is NOT armed to record) and record your voice by singing along while listening to the guitar part. I recommend doing this step (recording your voice) 2 or 3 times (on tracks 3, 4 and 5, for example) so you can choose the one that sounded the best.
Once you have a vocal track that sounds good, mute (click the “M” on the track control panel) or even delete the vocal tracks that were not keepers. Then play your song and adjust the volumes (yes, this is shown in the video too:)) of the guitar and voice until they sound good together.
Save the song in Reaper, and do this again for the next song, and the next, until you have all the songs for your album or demo recorded. Save all the songs (called Rendering in Reaper) as 16-bit stereo wav files and put them all in the same folder on your computer.
Creating and Selling Your Album
Burn your songs to a CD
This used to be so hard and now it is incredibly easy. I love living in the 21st century:). OK, so what to do with your song files – decide what order you want them to be in and then simply burn them to a CD using a program like NERO or even Windows can burn CDs now.
Album Art
Once that is done, you’ll need some album cover art. You can do this in any graphics program like Photoshop, Gimp or similar.
Create Album in Kunaki
When you have the songs recorded and the artwork done, go to a site called Kunaki, which is an incredible service (a FREE service!) that lets you upload your songs and artwork, and then they create the album for you! You can get physical copies of that CD mailed to you for $1.00 per CD, and the artwork looks fantastic! But don’t get too many physical copies just yet. Remember that we live in the digital age. You’ll want to make your album available on iTunes and all the other digital stores. Here’s how to do that.
Make Your Album Available on iTunes
Once you have received at least one copy of your physical CD from Kunaki, and made sure there were not typos and that the CD plays OK, it’s time to go to CD Baby, another awesome internet service that costs just $49 per album. You simply visit the site and follow their directions for setting up your album. Send them a copy of your CD, which is easy with Kunaki. Just tell Kunaki to mail a copy to CD Baby. Once the album is all set up on CD Baby, they do all the work of making it available not just on iTunes, but also Amazon, Spotify, Facebook, CD Baby itself, and 2000+ record stores. How’s that for awesome?
Now all you have to do is tell your fans or soon-to-be-fans how to get your CD/album/mp3s. You can send them straight to your page on CD Baby, or to you iTunes link, or to your Facebook page. They can listen to clips of your music for free and then buy either the entire album or individual song mp3s. CD Baby even has an awesome widget that sets up a store for you on your Facebook page. When someone buys the physical CD from CD Baby, they (CD Baby) will handle the order processing and shipping (excellent!). Periodically, CD Baby will ask for more CDs. When they do, just have Kunaki ship them.
That is really all there is to it. You now have an album/CD people can buy. Yes, this was a simple album example. But the process is the same regardless of what kind of music you record. You may have to buy some extra and different equipment to suit your individual needs. If you have a full band you want to record, for instance, you might want an interface that records 8 or more tracks at a time.
Here at Home Brew Audio we are constantly posting new articles on how to do recording. Right now we have well over 200 articles available to anyone to peruse. We also have video tutorials available, such as our courses, The Newbies Guide To Audio Recording Awesomeness, How To Build A Home Recording Studio, and more. If we don’t have an article or tutorial that shows you how to do what you need to do, please let us know by the comment section below and I will make sure we get one done ASAP.
There are many roads to becoming a successful singer, but they will all involve having your own recording. Now you know that you don’t need to save up thousands of dollars for a recording studio whenever you want to record. Learn how to do it yourself in the comfort of your own room at home. We’ll show you how.
If you’d like to see and hear some examples of songs recorded on my modest home studio right here in a converted bedroom, check out the following:
Cover of That Thing You Do!
Cover of My Eyes (from Dr. Horrible’s Sing-Along Blog)
Harmony examples (where I sang all the parts) – click the “music” player on the top of the page
Ken Theriot CD Baby page – This is my music, all recorded as described in this article and an example of what you can have on CD Baby
I’m 9 years old and I want to sing really bad but I dont know. How to get started. Please. Help me????
That’s great. There are lots of ways to get started. But you really need to have your parents involved at your age. You should definitely keep singing though – no matter what you do. Sing at home. Sing at school. And another piece of advice is to learn to play an instrument to accompany yourself. I play guitar, and you can always take one with you. I wish I had learned piano. But you can’t take those with you on a bike or car, of course:).
Good luck!
Ken