Podcast Recording – Some Microphone Basics
Let’s talk about 2 kinds of mics. There are:
- USB microphones – which you plug directly into a computer’s USB port – and
- “Standard” microphones (with 3-pin “XLR” connections)
USB Mics
If you are on a budget, a USB mic is a great and convenient way to record your podcast. And yes, it is basically a case of plug it into your computer, press “Record” in a recording program, and talk into the mic. Done.
But if you want your podcast to sound GOOD, there are a few other considerations. First, you’ll want a good quality mic. Not all USB mics can record professional sounding audio. As I said earlier, you want one with a large diaphragm. So look for the term “large diaphragm” (surprising, right?) in the description of the mic.
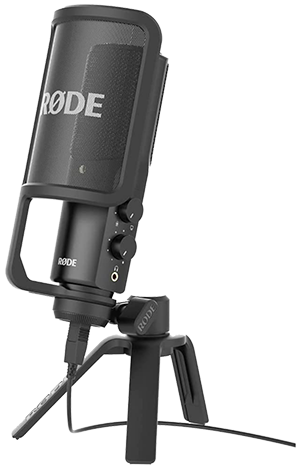
Probably the best USB mic I’ve used for vocal recording is the RODE NT-USB+. I did a review of this mic recently, along with audio samples. Check that out here: My Review of The RØDE NT-USB+ Pro USB Microphone.
But it is common for people to record bad-sounding audio even with the best mics. You need some tips on how best to use the mic. Fortunately, I have written a post about that very thing, which you can find here: Quickly Improve The Audio Quality Of The Blue Yeti. There are several pieces of this puzzle. But most of it boils down to GET YOUR MOUTH CLOSE TO THE MIC. This will help minimize that all-too-common room reverb in your recordings.
Standard Mics
If you can afford to invest a little more for your setup, get yourself a standard large diaphragm mic. These CANNOT plug directly into your computer. So you’ll need a recording interface unit. You plug the mic into that, and then the interface connects to the computer with a USB connection. More on the interface in a bit. First, what are good standard mics? There are so very many. But I’ll divide them into two kinds: condenser and dynamic.
Condenser Mics
Condenser mics are considered to be more sensitive and also need something called “phantom power.” You can learn more about the differences between condenser and dynamic mics in my post Condenser vs Dynamic Microphone: What Is The Difference?
Large diaphragm condenser mics are the most common for recording singing, for sure. But they are great for ALL kinds of vocals. The Blue Yeti that I mentioned earlier is a condenser USB mic. A decent standard condenser mic for vocals is the Audio-Technica AT2035, though there are many dozens of other kinds out there. Personally, my go-to large diaphragm condenser mic is the Rode NT2-A.
Dynamic Mics
Dynamic mics are considered to be more durable and can often handle louder voices without distorting. They (standard ones) are super common for live performing. Those hand-held mics that singers use on stage are dynamic mics like 99% of the time. Usually I would NOT recommend them for recording. HOWEVER, certain kinds of dynamics like the Electro-Voice RE20 and the Shure SM7b are great for podcasting and broadcasting in general. You’ve almost certainly seen them on TV or YouTube whenever they show people podcasting. Those are all standard mics (requiring an interface).
There are also dynamic USB mics that are currently popular for podcasting, such as the Shure MV7, and the Rode Podcaster.
Interface Units
I promised more about audio recording interfaces. These are required for standard (3-pin/XLR) microphones, which need amplification before hitting the computer. The interface has amplifiers built in (called “mic preamplifiers”). Also, condenser mics require power (called “phantom power”), which an interface also provides. Again, though there are tons of interfaces out there, I can recommend the Focusrite Scarlett Solo to start.

You can find out much more about interfaces in my post: What Is An Audio Recording Interface?
Recording Software
There are tons of different recording programs out there. But you can start with Audacity, which is free! As amazing and possibly a little suspicious as that sounds, you can absolutely record and produce professional podcasts with Audacity. I have a playlist on my YouTube channel with tons of tutorial videos for using Audacity here: Audacity Tutorial Playlist.
Sometimes people interview guests over Zoom (or other conferencing sites/apps). And in those cases folks don’t often need software fore the recording, since those apps do the recording for you. HOWEVER, you wouldn’t be able to do any real editing of the audio doing it this way.
What To Do With All of This Stuff
- Find a place that isn’t too noisy, and also isn’t to “echo-y.” Most home offices are in small square or rectangular rooms. That shape is not ideal for good audio, causing lots of reverb/echo in your recordings. This makes your audio sound amateurish. You can reduce this reverb by putting soft, absorbing materials on the walls in the room. But probably the best – and easiest – way to reduce room reverb is to get your mouth close to the mic. I’m talking like 3-4 inches, if you can.
- Decide on recording software. Hit the “Record” button, and start talking. Make sure you record as loud as possible, but making absolutely sure you don’t get TOO loud and risk overloading and distorting your audio.
- Edit the recording with the software and render it out (as an mp3 file), ready for the world to listen to.
- Upload the finished mp3 file to your podcast hosting service.
Really, those are the basics. Depending on what kind of show you have, there are other variables like how to handle multiple show hosts, guests (both live or by phone or Zoom, etc.), and recording remotely. I’ll talk about those things in the next post.