How to Build a Home Recording Studio: Part 2 – Six Tips For Preventing Noise
This is part 2 in a series called How to Build a Home Recording Studio, where you learn how to set up a computer-based studio capable of recording pro-quality audio.
In part 1, I left off in the section talking about ways of preventing noise in our recordings. And by “noise” I’m talking about three main things. First is stuff like leaf-blowers, barking dogs, computer fans and air conditioner motors and fans.
Second – if you are recording vocals, you’ll get mouth noises such as popping p sounds and “clicky” saliva sound. The third kind of noise includes room echo and reverb.
Acoustically Ideal Space
The best way to record noise-free audio is to record in an acoustically ideal space. One that not only is dead quiet, but does not affect the audio in a negative way either. The problem with most home recording studios is that they are usually set up in a converted bedroom. And these are FAR from ideal, acoustically. I’ll get into why below.
What are My Options?
So since ideal acoustic spaces are really hard to come by in home studios, the best option would be something like a purpose-made vocal isolation booth. You need the kind treated with acoustic materials to prevent and/or absorb echos, allowing you to record only the signal (the thing you WANT recorded, like the voice or instrument). Let’s take a look at some of these.
You can buy a full-blown vocal booth, such as the Clearsonic IsoPac, which will run you about $1,100. Yeah, it can get pretty expensive to get a proper vocal booth in your studio.
Another commercially available option that is pretty popular is the Whisper Room booths, which go for between $4,000 and $10,000 dollars! Yeah, not many of us are looking at a budget like that. At least not at first.
Avoid the Closet
The room sound in even a tiny room can sound bad, especially in the case of a square or rectangular closet. I HIGHLY recommend you do NOT just go into a closet to record, thinking that it will sound better. Yes, you can block out the extraneous noises, like leaf blowers and fans. But the room sound will be very boomy and boxy.
You MIGHT be able to use a closet If you stuff it full of very acoustically absorbent materials (or lots of coats and jackets!) so no sound can reflect of the walls, or make sure there are no parallel surfaces – preferably both.
For most of us, it is often impractical or too expensive to have either a very quiet recording space, or a good sounding isolation booth. Most of us do our recording in a spare bedroom, and bedrooms are notoriously effective at producing “bad” echos that when added to the signal, make the audio worse.
Why Do Bedrooms Sound So Bad?
Sound bounces off of hard surfaces all over your room, combining with each other to amplify and/or reduce certain parts of the sound. Then all these different mutant versions of your voice arrive at the microphone along with the direct signal. The results are echo-y at best, and likely will also sound unnatural and funky (sounding muffled, tinny, or like it came over a telephone – or even all of these).
If you’ve watched a lot of internet videos where someone is narrating, you have almost certainly heard the echo-y room sound thing. In fact it is way too common that a very slick and professional looking video has poor audio laid over the top. Usually it sounds like the person is speaking in a bathroom or something.
In the case of talking-head videos (a person talking to the camera – not the 80s rock group:)), this is almost always caused by the fact that the narrator is relying on the built-in camera mic, which is several feet away. The further your sound source is from the mic, the more room sound will be recorded.
Alternatives to Sound Booths
If you don’t have a booth, there are still things you can do – and for a much more affordable price, starting with “free.”
The first thing we have to do is deal with room noise before any sound reaches the mic.
Acoustic Foam on the Walls
If you can afford acoustic absorbing foam on your walls, it will be so much easier to reduce room noise. A good place to start is with Auralex products.
These allow you to stay in the main room (as opposed to a booth or closet), which is much more convenient and comfortable. You will still have computer fan or A/C fan noise. But that can be both minimized, and removed with noise reduction software.
This still can be a pricey option. So if you cannot yet put acoustic foam on the walls, the following tips will help immensely.
Tip #1: Use a Mic With a Cardioid Pickup Pattern
Fortunately, most mics default to that pattern. Cardioid mics record only what is in front of them. They reject any sound coming from behind them and most of the sound coming from the side. These can help reduce room noise a lot.
If you have a computer fan, or other source of extraneous noise like that, point the BACK of the mic toward the source (like the computer). That way a cardioid mic will reject that sound, since it will be coming from behind it.
Tip #2: Get Your Mouth Close to the Mic – like 4-6 Inches
This will help the mic get mostly your voice (the signal) and less of the reflected sound. This is probably the most important, and fastest thing you can do if your recording space is less than ideal. This is doubly true if you are shooting “talking head” video. See our article, Sound For Video: How To Get Good Audio On Your Videos, for more on this.
Tip #3: Record as Loud as Possible Without Distorting/Clipping
A LOT of people make this mistake. They record their voice at a low level, and then they raise the level after the fact. The problem is that they are also raising the noise when the do this. So make sure to capture as high a level as possible of your voice in the first place. You can use the gain level on your interface (if you have one) or use the software mixer panel controls to do this.
Tip #4: Blankets Behind and In Front of You
One reason for a lot of the reverb in a rectangular bedroom is that sound bounces off the wall you are facing, and comes back at you. A cardioid mic can reject noise coming back toward you. HOWEVER, the sound will then bounce off the wall behind you and come right into the front side of the mic. Since it had to travel further, it will combine with the direct audio from your mouth, and sound like an echo.
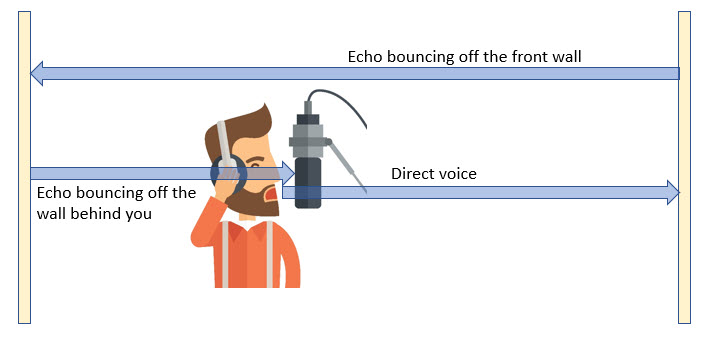
But if you can hang some acoustic blankets, or even some of that acoustic foam behind you, that could reduce the reverb by reducing the amount of sound that bounces off the wall behind you. You might even be able to use some large, soft things you already have, such as moving blankets or even mattresses!
You can reduce that echo even more if you have enough absorbing material to put on the wall in front of you AS WELL AS behind you.

Tip #5: Noise Reduction
The next step in producing clean audio is to reduce the noise that will inevitably be in our recording when our rooms are less than perfect. The way to do that is to use tools in recording software called noise reduction.
What NR does is sample a section of the audio that is ONLY noise (when there is no voice talking), so it knows what to turn down. Then the program separates the noise from the signal and gets rid of it, ideally leaving the signal/voice unaffected. That last bit is really hard to do.
There is often some “artifact” left behind after NR is performed. It usually sounds like swirling water. So you have to play with the settings to find the right balance of noise reduction without making the signal sound too weird. And the more noise there is to start with, the worse that swirly artifact is.
Tip #6: Mouth Noise Removal
You can also remove popping p (or “b” or “th.” etc.) sounds and saliva “clicks” using software.
P-Pops (Plosives)
There are ways to prevent mouth noises. For plosive sounds – low frequency blasts of air caused by certain consonants like the letter “p” or “b”, or even “th” and “ch” – you can use a pop screen or “pop filter” in front of your mic. But even with one of those, you will likely get SOME popping p sounds in your recording.
Luckily you can use software to remove these sounds. I detail how to do that using free software called Audacity in my article (with video) here: How to Fix a “P-Pop” in Your Audio With A Sound Editor.
Another very common mouth noise issue is the clicking sound caused by either a dry mouth, or even too much moisture in your mouth.
There isn’t much you can do to prevent this except maybe drinking water or eating sour apples. Again, though, there is a free way to remove these if they DO end up in your recording.
I have another article (with video) about how to do this using Audacity here: How To Use An Audio Editor To Remove Saliva Noises From Voice Recordings.
If you do all six of those things, you can get the best possible audio out of the cheapest possible gear. It’s what I did in the $5.00 vs $500 thing.
That is the first answer to the question of how we move toward pro audio from the $5.00 setup – having a basic understanding of how to limit noise.
In the next installment of this series, we’ll talk about digital audio what kinds of microphones can be used to give us even better sounding audio.
Invaluable info Ken! Thank you!
You’re welcome Sam!
This was very helpful, thanks.
You’re quite welcome!