In part one of this article, I showed you how to use overdubbing to fix mistakes as you make them when recording in Reaper recording software – though the process is the same regardless of what program you use. The process is very similar if you discover mistakes after you’ve already finished recording a part. There are only a few additional things you have to do.
Fixing the mistakes after the fact
This method is also useful for when you discover short undesirable things in your recordings after you’ve completed them. For me, this is most often guitar string buzz, or a brief brain-fart where I hit the wrong chord just for a second before recovering.
I use this process when doing voice-over projects. It is especially useful for very long jobs like audio books. You don’t want to keep stopping and starting. So when you make a mistake, just let the recording continue move on. You’ll want to make a note of where the mistake occurred, however, so you can go quickly find them all when editing. One easy way to do this is to clap your hands, or snap your fingers (any loud quick sound) very close to the mic after your mistake. This will cause a spike in the audio waveform that is easy to spot.
Often I will simply re-record the part I messed up immediately after I make the error, and then move on. In this case there is no need to overdub. You can simply delete the mistake when editing afterward. See our post How To Finish Long Voice-Over Jobs Faster for the step-by-step on how to do this. Otherwise you’ll want to use the overdubbing method, which is almost exactly the same as the process to fix mistakes as you go, as described above.
Here are the steps:
Find where the mistake happened in the audio.
Put your cursor right before it occurs.
Create a split in the recording (audio item). In Reaper, as in many other audio and video programs, the “S” key on your computer keyboard is the hot-key for Split. Otherwise, in Reaper just right-mouse-click and choose split items at cursor.
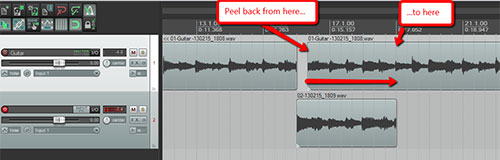
Once you have the split, grab the leftmost (beginning) edge of the piece that has the mistake in it and drag to your right. This literally peels back the audio until the mistake is gone (note: this does not delete that audio! If you drag too far, simply drag the edge the other way to put it back. I love this non-destructive feature of editing in Reaper).
Now you will have a gap in the audio where the mistake was. Simply create the new track under the original one just like in the steps above, being sure to disarm the old track and arm the new one.
Place the cursor 5-10 seconds before the gap and start recording on the repair track until you are well past the gap in the original audio.
Drag the edges of both ends of the repair audio until they correspond with the ends of the gap in the original audio.
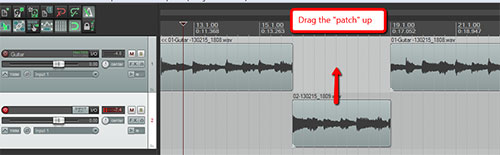
Finally, drag the new audio up into the gap to patch it.
Then as before, adjust the cross-fades at the seams to get smooth transitions.
In the old days it was often easier to simply record the part as many times as you had to (take 1, take 2…take 35!) until you got it right. Uggh. Both of the methods described here, made feasible by computer-based audio recording, will allow you to quickly create error-free recordings that sound natural.
Here is a video showing you the process I just described:


Ken really enjoy your posts about how to fix & repair a mistake in your recordings I think I like this method best. thanks again!!! : )
Thanks for that feedback Sunny. And thanks again for you kind comments!
Ken