Another Way To Make A Podcast Sound Professional
In this series of posts, I’m sharing ways to make your podcast sound more professional. Mostly I am talking about audio quality here. Also, you can use these tips to improve your voiceovers, audiobook narrations and videos, of course.
The first post of the series showed you the fastest and cheapest way to make a huge audio quality improvement, no matter what microphone you happen to be using. And that was to get your mouth close to the microphone. Probably closer than you might think – about 3-4 inches, if possible.
Today, I offer another tip that is also free – no new gear needed. And that is to…
Record As Loud As Possible Without Being Too Loud.
When I say “loud,” what I’m really talking about is input level. Sometimes terms like loud, level, amplitude, loudness and volume are used interchangeably when they really mean slightly different things. See my post Gain, Volume, Loudness and Levels – What Does It All Mean? if you are interested in more on this.
For this tip, I just mean that your voice needs to recorded with a good strong input level, but not TOO strong. Or else you could be too loud and overload the system, causing that nasty, buzzy distortion. A picture might help.
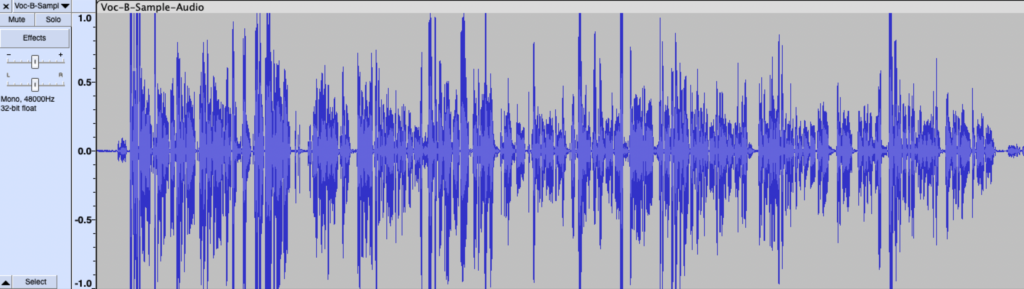
What Does Loud Enough Look Like?
You want the wave form in the audio software to look something like this:
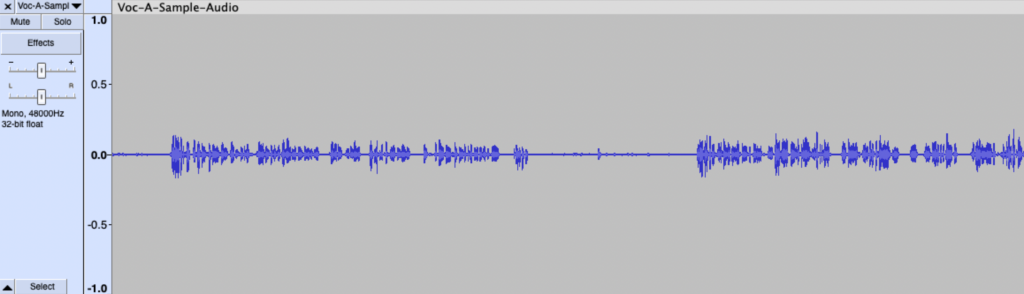
What Is Not Loud Enough Look Like?
You do not want this, because the input level is too low:
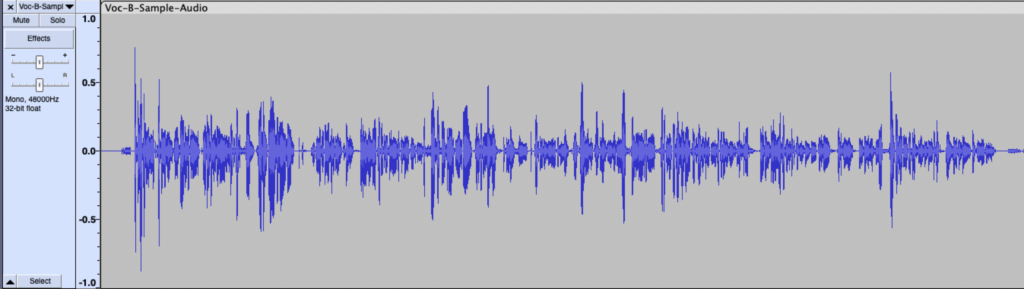
What Does Too Loud Look Like?
And you do not want this, because the input level is too high. The audio overloads the system and will distort:
Why?
There certainly will be SOME steady background noise in your room (computer fans, A/C or heater, etc.). And depending on what kind of microphone you use, the could well be “self-noise” coming from the electronics – some hiss or maybe buzz. So if your recording level is too low, what will you want to do in order to make it loud enough? Yes – turn it up! So what ELSE gets turned up by the same amount. Yup. The noise.
So recording at too low a level will often result in too much noise mixed in with the audio because you have to turn EVERYTHING up to get the voice loud enough.
How To Do It
I mentioned in the first post that you need to have your mouth close to the microphone. Do NOT sacrifice this in order to control input level! This is a common mistake. It might feel logical that if the audio is too loud, you get further away from the mic to reduce the level. Someone might tell you to “back off the mic a bit.” NOOOO.
Do not sacrifice the advantage of being close to the mic – to capture the richness and detail of your voice with a minimum of room reverb – just to reduce the input level.
There are two ways to control the input level that will allow you to keep your mouth close to the mic.
- Use the “gain” control on the interface. If you are using a standard microphone plugged into a recording interface box, there will be a knob to control the input level. Use that.
- If you use a USB mic, which does not use a separate interface, you must use the control in Windows or Mac. I have instructions and pics on how to do this in the last post.
- Some USB mics DO have an input gain knob on the side of the mic, itself. One example is the Blue Yeti mic. See my post Quickly Improve The Audio Quality Of The Blue Yeti on how to use this control. Use this AND the Windows/Mac input level control. I had one client who was still too loud even after turning the knob on the Yet ALL the way down! Apparently the Yeti will still record even with the Gain knob at zero. SO, she was finally able to get it low enough by turning it down in the Windows Sound control.
So before you just start recording, do a couple of tests, first, in your recording software. See what the wave form looks like. Tweak your input controls until it looks like that first picture above.
Once you know it is loud enough, you need to make sure it doesn’t get too loud at some point in the script/show you’re recording. In order to do this, find a few sections where you know you’ll have a lot of energy and test those at what will probably be the loudest part of your recording. Make sure that does not overload the system and become distorted.
Combining the first and second tips – staying close to the mic and making sure you record loud enough, but not too long – will give you an excellent foundation for optimizing the quality of your audio, no matter what kind of mic you’re using.
Thanks Ken
According to your illustration, I have been recording too low. What I have been doing is using the normalize function to bring levels up, then when I render, if there is peaking (lots of red lines), I reduce the master control down until there is no peaking at the rendering. Is that too much/wrong/incomplete? I will try your suggestion and see what happens.
Hi Michael! I would definitely try to do it so you get a better (higher) level on input. Normalizing in your case would turning everything up to a certain target. But that should not be causing the red lines unless you are using Loudness Normalization. In fact that must be what you’re doing, right? That form of normalizing adds a lot of processing, including compression. The further your average volume is from your target, the more processed and likely noisy the end product would be. So the best thing to do would be to get a higher level on input to get the average volume closer to your target so the processing doesn’t have to work so hard.
Are you using an interface? If so, does it have 2 inputs like the Focusrite Scarlett 2i2? If so, the low level might be caused by the issue I describe here: https://www.homebrewaudio.com/154/is-your-audacity-recording-too-quiet/
Hi Ken;
Merry Christmas and happy new year ahead of Newyear. Thank you for your beautiful and worthy gift for this beautiful season of the year.
Thanks Shah! Same to you!