Voice Over Recording Equipment
Voice over recording equipment is more powerful and more affordable than ever before in 2020. Unlike the needs for musicians, voice over actors need very little in order to produce professional sounding results from their voice recording studio right from home.
Before I start claiming that all you need is a mic and a computer (which is pretty much true), or that the mic can be cheap (also true), I should qualify something.
Time Versus Money
In general, the cheaper the microphone and/or interface, the longer it will take you to record professional sounding voice overs. It is possible. But you sort of trade time for money. And for some, that’s OK. They may have more time than money. Lots of people do.
I actually include “time” in my list of recording gear for home studios. The reason for this is that you CAN record decent quality sound from a mic costing about 50 bucks (what I consider the minimum). But the less expensive gear tends to also record noise.
It is definitely possible to fix most noise problems with software after your record your voice. But that takes time. Some noise removal takes quite a lot of time.
What Takes So Long?
For instance, fixing p-pops (see our post How to Fix a “P-Pop” in Your Audio With Sound Editing Software for more on that) takes a lot more time to fix than to actually read the script you are recording. Removing saliva noises (see my post on that here How To Remove Saliva Noises From Voice Recordings) can take just as long. So if you are doing both – well, you see where this is going.

I’ve now mentioned two bits of voice over recording equipment – time and a pop-filter. The pop filter will help prevent most of the p-popping (plosive sounds), that bane of voice over recording. But I have never yet recorded a vocal where the filter prevented ALL p-pops. So you’ll want to know how to get rid of them after the fact, which is covered in the article linked above.
So What Else Will You Need?

Earlier I mentioned a microphone. I also said I thought you’d need to spend at least $50 or so, minimum, in order to get into the realm of professional sounding audio. That is how much it costs for a USB mic called the Samson Q2U (or Q1U). [update: The Q2U, which is the latest version of the Q1U, now has BOTH an XLR output AND a USB. That’s huge news. I did a review of the Q2U here: Review Of The Samson Q2U Microphone – Hear The Test Audio For Yourself.]
With a slightly larger budget
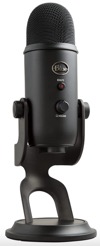
Still staying with the less expensive USB mic option, you can get much better quality with a large diaphragm condenser mic. I recommend the Blue Yeti mic for this. It sounds better than most USB mics I’ve ever tested. You can hear some samples in my post here: Quickly Improve The Audio Quality Of The Blue Yeti.
Moving up 1 more level of quality
If you can afford even a bit more in your budget, I highly recommend the kind of set-up used my most professionals. By that I mean a standard (non-USB) microphone and an audio interface. The interface is a box that plugs into a computer, usually via USB. You plug the microphone into the interface.
The KIND of mic I recommend as your first upgrade from a USB mic is a “large diaphragm condenser” microphone. There are terrific for vocals. A good entry-level large diaphragm mic is an Audio-Technica AT2020, which you can get for about $99.

As for the interface, a great option is a Focusrite Scarlett Solo. One of those will also run about $99. Then along with that, of course you’ll need accessories like a mike stand and cable, and headphones to allow you to listen very closely to your recording, making sure you have no little noises between words and phrases. Those can be hard to hear with just speakers alone.
then if you want to upgrade your mic, you can do that and still use the same interface.
Amazon has a studio kit that has all you need to get started. It has the Focusrite interface, microphone, mic cable and headphones. Here is a link to the Focusrite Scarlett Solo Studio Bundle. That bundle, plus the addition of a mic stand and pop-filter, will run about $256.
If you do get a large diaphragm condenser microphone, you’ll want to add a shock mount to your list. This will suspend your microphone by elastic rubber cords so that no vibrations from the mic stand will be picked up by the mic. Luckily, the Audio-Technica microphones come with a shock mount. But you may need to buy them separately for other mics.
The last piece of your voice over recording studio puzzle is the software. Fortunately, the free Audacity is truly all you need to get started. You can learn how to use it in our course, the Newbies Guide To Audio Recording Awesomeness.
As you are able to afford it, you can easily upgrade this studio by trying out better and better mics. But you may not ever need to! You may find the studio bundle is all you need to sound as professional as necessary to become a pro.
Free videos from “The Newbies Guide to Audio Recording Awesomeness”

[…] don’t need to use a lot of expensive voice over recording equipment, but you do need to know some things about how to use what you DO […]